Setting up a Maven Project
A Maven project is defined by its pom.xml: the Project Object Model that declares the project's coordinates (groupId, artifactId, version), dependencies, and build plugins. This article walks through creating a minimal pom.xml, adding dependencies from Maven Central, and running the standard build lifecycle phases: compile, test, and package.
To start with a Maven project, first thing is we need to create a pom.xml
<project xmlns="http://maven.apache.org/POM/4.0.0"
        xmlns:xsi="http://www.w3.org/2001/XMLSchema-instance"
        xsi:schemaLocation="http://maven.apache.org/POM/4.0.0 http://maven.apache.org/xsd/maven-4.0.0.xsd">
    <modelVersion>4.0.0</modelVersion>

    <groupId>io.cscode.tools</groupId>
    <artifactId>my-app</artifactId>
    <version>1.0-SNAPSHOT</version>
    <packaging>jar</packaging>

    <properties>
        <maven.compiler.source>14</maven.compiler.source>
        <maven.compiler.target>14</maven.compiler.target>
        <project.build.sourceEncoding>UTF-8</project.build.sourceEncoding>
    </properties>

    <dependencies>
        <dependency>
            <groupId>junit</groupId>
            <artifactId>junit</artifactId>
            <version>4.13.2</version>
            <scope>test</scope>
        </dependency>
    </dependencies>
</project>
All the settings related to Maven project are specified under
projectgroupIdartifactIdversion
- groupId uniquely identifies your project among all other projects.
- artifactId is the name name of jar file without version included in it
- version is the version number of the artifact, you can use versioning such as 1.0, 1.1.1 etc.
- packaging tells what is the final outcome of this POM going to be.
How to create a parent - child pom
If you are working multiple Maven projects and/or modules where there are common dependencies across all projects, to avoid redundancies and duplicate configurations across these projects, you can create a parent project where common dependencies are defined and use that in child projects.
If there is any dependency or properties are configured in both parent POM as well as child POM, then child POM value takes the priority.
-
To create a parent project, all we have to do is in the
pom.xmlpackagingpom<packaging>pom</packaging> - Next, in your child
pom.xmlparentpom.xml
<project xmlns="http://maven.apache.org/POM/4.0.0"
        xmlns:xsi="http://www.w3.org/2001/XMLSchema-instance"
        xsi:schemaLocation="http://maven.apache.org/POM/4.0.0 http://maven.apache.org/xsd/maven-4.0.0.xsd">
    <modelVersion>4.0.0</modelVersion>

    <groupId>io.cscode.tools</groupId>
    <artifactId>parent-app</artifactId>
    <version>1.0-SNAPSHOT</version>
    <packaging>pom</packaging>

    <properties>
        <maven.compiler.source>14</maven.compiler.source>
        <maven.compiler.target>14</maven.compiler.target>
        <project.build.sourceEncoding>UTF-8</project.build.sourceEncoding>
        <spring.boot.starter.web.version>2.7.6</spring.boot.starter.web.version>
    </properties>

    <dependencies>
        <dependency>
            <groupId>org.springframework.boot</groupId>
            <artifactId>spring-boot-starter-web</artifactId>
            <version>${spring.boot.starter.web.version}</version>
        </dependency>
    </dependencies>
</project><project xmlns="http://maven.apache.org/POM/4.0.0"
xmlns:xsi="http://www.w3.org/2001/XMLSchema-instance"
xsi:schemaLocation="http://maven.apache.org/POM/4.0.0 http://maven.apache.org/xsd/maven-4.0.0.xsd">
<modelVersion>4.0.0</modelVersion>
<parent>
<groupId>io.cscode.tools</groupId>
<artifactId>parent-app</artifactId>
<version>1.0-SNAPSHOT</version>
</parent>
<artifactId>child-app</artifactId>
<version>1.0-SNAPSHOT</version>
</project>Fast track way of creating Maven project in Intellij and Eclipse
Easiest way of creating Maven project in modern IDEs are to just create a pom.xml
-
If you are using Intellij, right click on the
pom.xml -
If you are using Eclipse, right click on the
project
Creating a maven project in Intellij IDEA using new project wizard
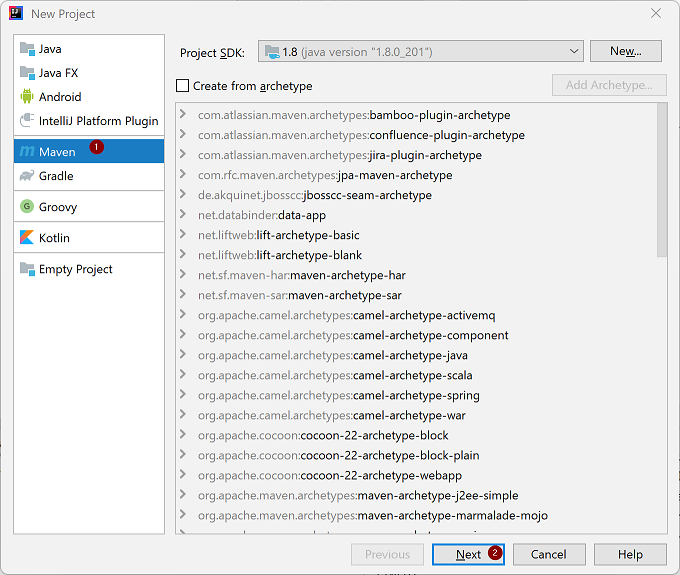
Intellij IDEA default installation comes up with an inbuilt Maven plugin. To create a Maven project, go to File New Project and choose Maven from Left side navigation menu and hit Next
Note: You can choose 'Create from archetype' if you wish to. (Archetype is a Maven project templating toolkit, meaning that template automatically adds necessary dependencies, plugins etc. in the pom.xml file.)
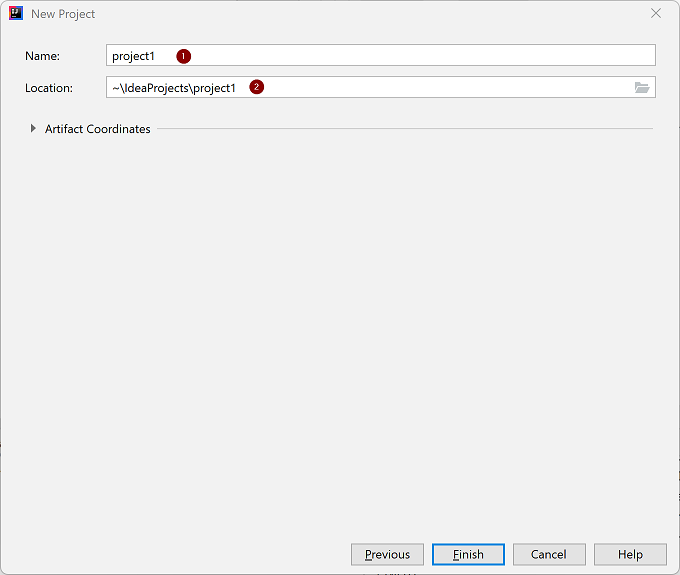
Enter a Name for the project and choose a directory Location for project files and hit Finish and your Maven project is ready.
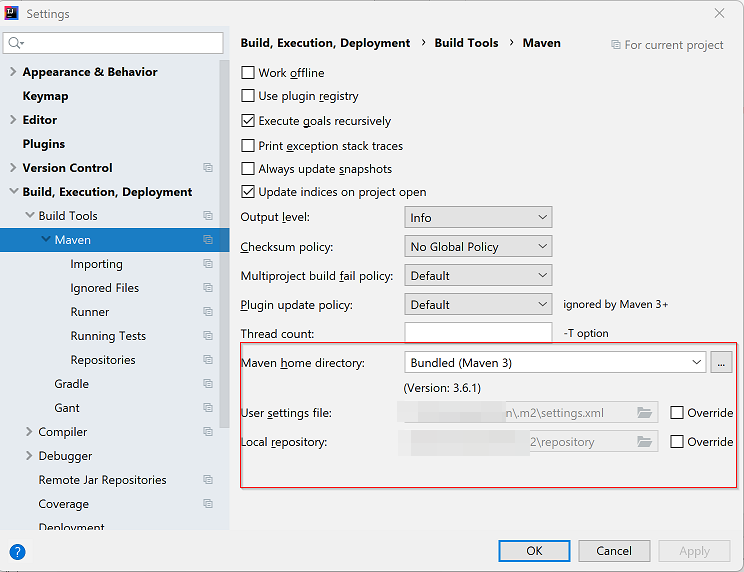
If you want to change Maven related settings, such as Maven home (or) User settings file (or) Local repository location, go to File Settings, then on the left side menu options navigate through Build, Execution, Deployment Build Tools Maven
Creating a maven project in Eclipse IDE using new project wizard
Eclipse default installation comes up with an inbuilt Maven plugin.
To create a Maven project, go to File New Other and select Maven Project option under Maven and hit Next
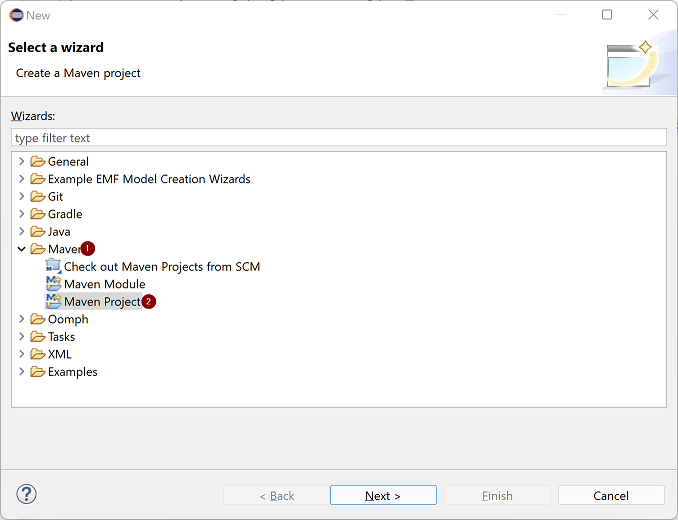
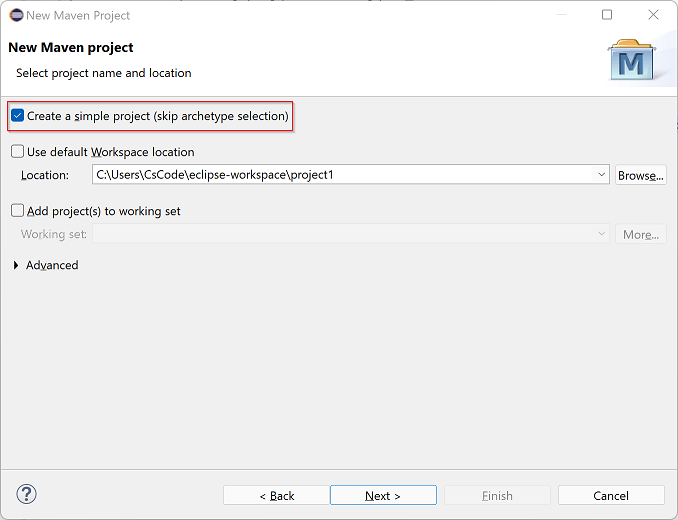
In the next screen check Create a simple project option and choose a Location directory for the project.
Note: If you can want to create your project from an archetype, you can uncheck 'Create a simple project' option. (Archetype is a Maven project templating toolkit, meaning that template automatically adds necessary dependencies, plugins etc. in the pom.xml file.)
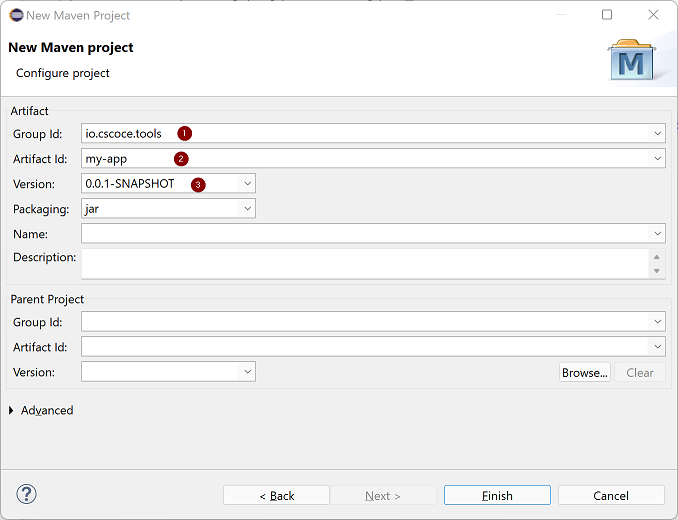
In the next screen, enter values for Group Id, Artifact Id and Version and hit Finish and your Maven project is ready.
If you want to change Maven settings such Maven home (or) User settings file (or) Local repository, follow below steps
To change Maven home, go to Window Preferences, then on the left side navigation options, navigate through Maven Installations
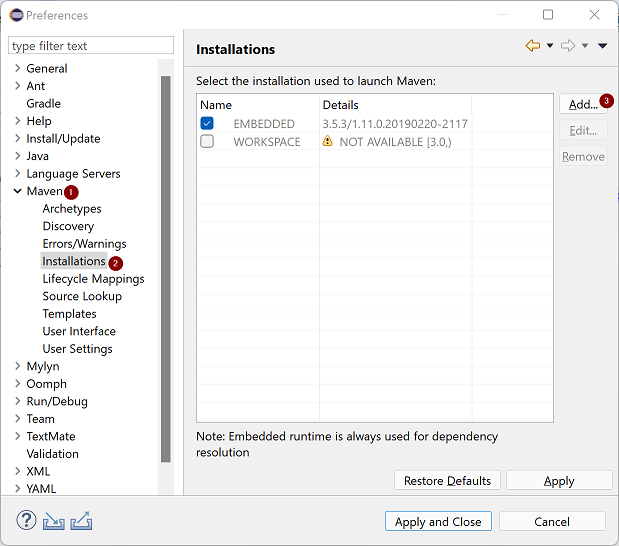
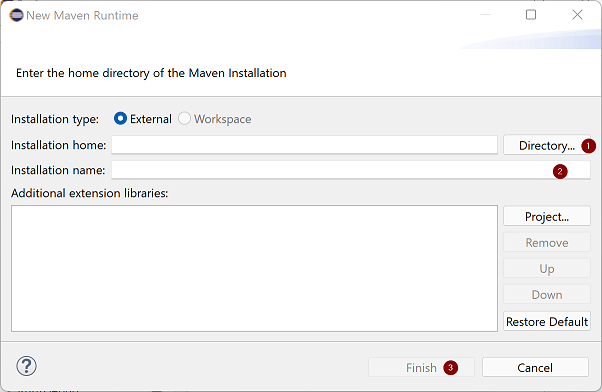
Now, Click on Add to add new Maven home that you wish to change to, enter Installation home and Installation name (installation name could be any meaningful name, something like Maven3.1) and hit Finish
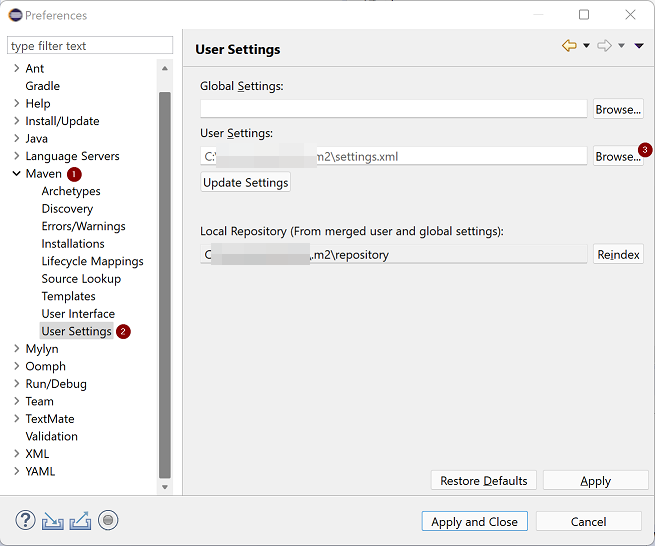
To change Maven settings file, navigate through Maven User Settings and select the settings file you wish to use.