VPC in the context Topics to know in VPC How to create a VPC Create a VPC with a Single Public Subnet Create a VPC with Public and Private Subnets Create a VPC with Public and Private Subnets and Hardware VPN Access Create a VPC with a Private Subnet Only and Hardware VPN Access
VPC isolates your AWS resources within an AWS region, and it can spans across all Available Zones within that AWS Region and can be extended to AWS Local Zones and Wavelength zones.
Within one AWS Region, you can create more than one VPC if you want to isolate resources, for example you may want to create a VPC for an application and its resources and create another VPC for another application if you don't want to share resource between these two applications.
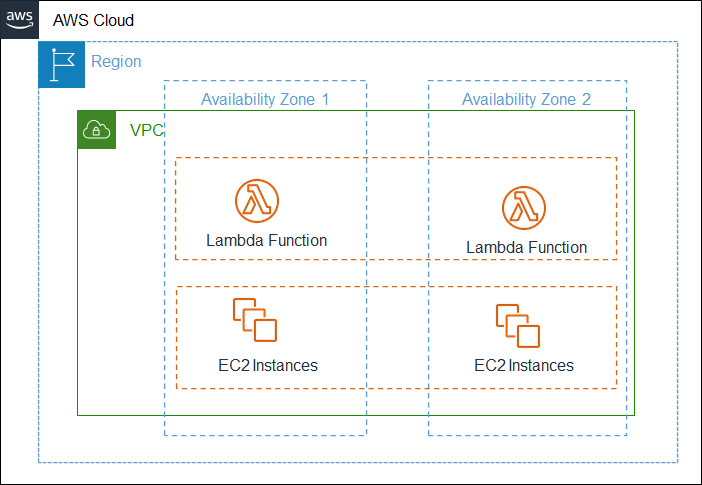
Below is a representation on a VPC in a Region that includes services like EC2 and Lambda functions and span across two availability zones.
VPC is the place for several settings, such as settings related to Networking, Network ACLs, Firewall settings, IPs, Routing tables, Gateway settings, Subnets, VPN and many other settings.
- CIDR Block (Classless inter-domain routing) : It is a notation that translates into a range of IP addresses, for example CIDR notation 10.0.0.0/16 will produce 65,536 IP addresses ranging from 10.0.0.0 to 10.0.255.255, this wikipedia link has more details on the CIDR notation https://en.wikipedia.org/wiki/Classless_Inter-Domain_Routing.
- Subnet: Subnet is a range of IP addresses in your VPC. When you create a subnet, you need to specify a CIDR block for the subnet and this should be a subset from CIDR block at VPC level. Also, when you create a Subnet, you can choose which type of IP address type you want IPv4 only, IPv6 only or with a combination of both depending on the need. Each subnet will belong to only one Availability Zone (AZ) and cannot span across other zones.
- Public subnet: If you choose your subnet to be public, then the subnet will have access to Internet traffic.
- Private subnet: If you choose your subnet to be private, then the subnet will not have access to Internet traffic.
- VPN only subnet: If you choose your subnet to be private, then the subnet will have access to virtual private gateway for a Site-to-Site VPN connection.
Note: As of writing this article, AWS doesn't support IPv6 traffic over a Site-to-Site VPN connection.
You can create a VPC as a separate setup or you can also do this from other services such as while launching an EC2 instance, because any resource that you are going to create should be part of a VPC.
From AWS Console, search for VPC service and navigate to VPC dashboard.

Next, from the VPC dashboard click on Launch VPC Wizard.

- In the first step, select the type of configuration that you want.
- VPC with a Single Public Subnet: This setup will have direct access to Internet, and to implement security control over inbound and outbound network traffic, you can use Network Access Control Lists (NACL) and Security Groups.
- VPC with Public and Private Subnets: This setup will add a private subnet which is not accessible from Internet in addition to public subnet, this configuration is useful in case if you have applications some are exposed over Internet and some are not. If you want to access Internet from the private subnet, you can use establish connectivity to Internet through public subnet using NAT Gateway (Network Address Translation).
- VPC with Public and Private Subnets and Hardware VPN Access: This setup will add a VPN connection (IPSec VPN) between AWS VPC and your data center, meaning that you are extending your data center to AWS Cloud while also providing direct access to the Internet for public subnet.
- VPC with a Private Subnet Only and Hardware VPN Access: This setup will add a private subnet which is not accessible from Internet and you can connect to this from your data center through VPN (IPSec VPN).

- The next step wizard will vary depends on the type of VPC you have chosen in above step, click on the below options that you have chosen.
If you have chosen VPC with a Single Public Subnet, then you will get below configuration wizard.
- IPv4 CIDR block: Provide CIDR block as needed, it reserves a range of IP addresses for your VPC, this is an important step as it cannot be changed once VPC is created.
- IPv6 CIDR block: This is optional, but you can choose from one of the option provided if you would like to have IPv6 IP addresses as well.
- VPC name: Give your VPC a unique name.
- Public subnet's IPv4 CIDR: This is for the default public subnet that gets created along with VPC, provide a subset CIDR block from VPC CIDR block, you can create additional subnets later if you want.
- Availability Zone: You can choose which Availability Zone that you want to create this subnet.
- Subnet name: Provide a name for the subnet that you can reference later.
- Service endpoints: You can select Service Endpoints here that you wish to allow to communicate from this VPC, for example services like DynamoDB or S3. You also need to specify the access using IAM policies if you select any. You can do this later as well.
- Enable DNS hostnames: By enabling this, AWS will add the unique names instances and the DNS server resolves the hostname to their IP address. DNS hostname is composed of hostname and domain name.
- Hardware tenancy: In this setting, you can choose if you want to have dedicated hardware for your tenant or the default setting, which AWS may share hardware with other tenants as well.

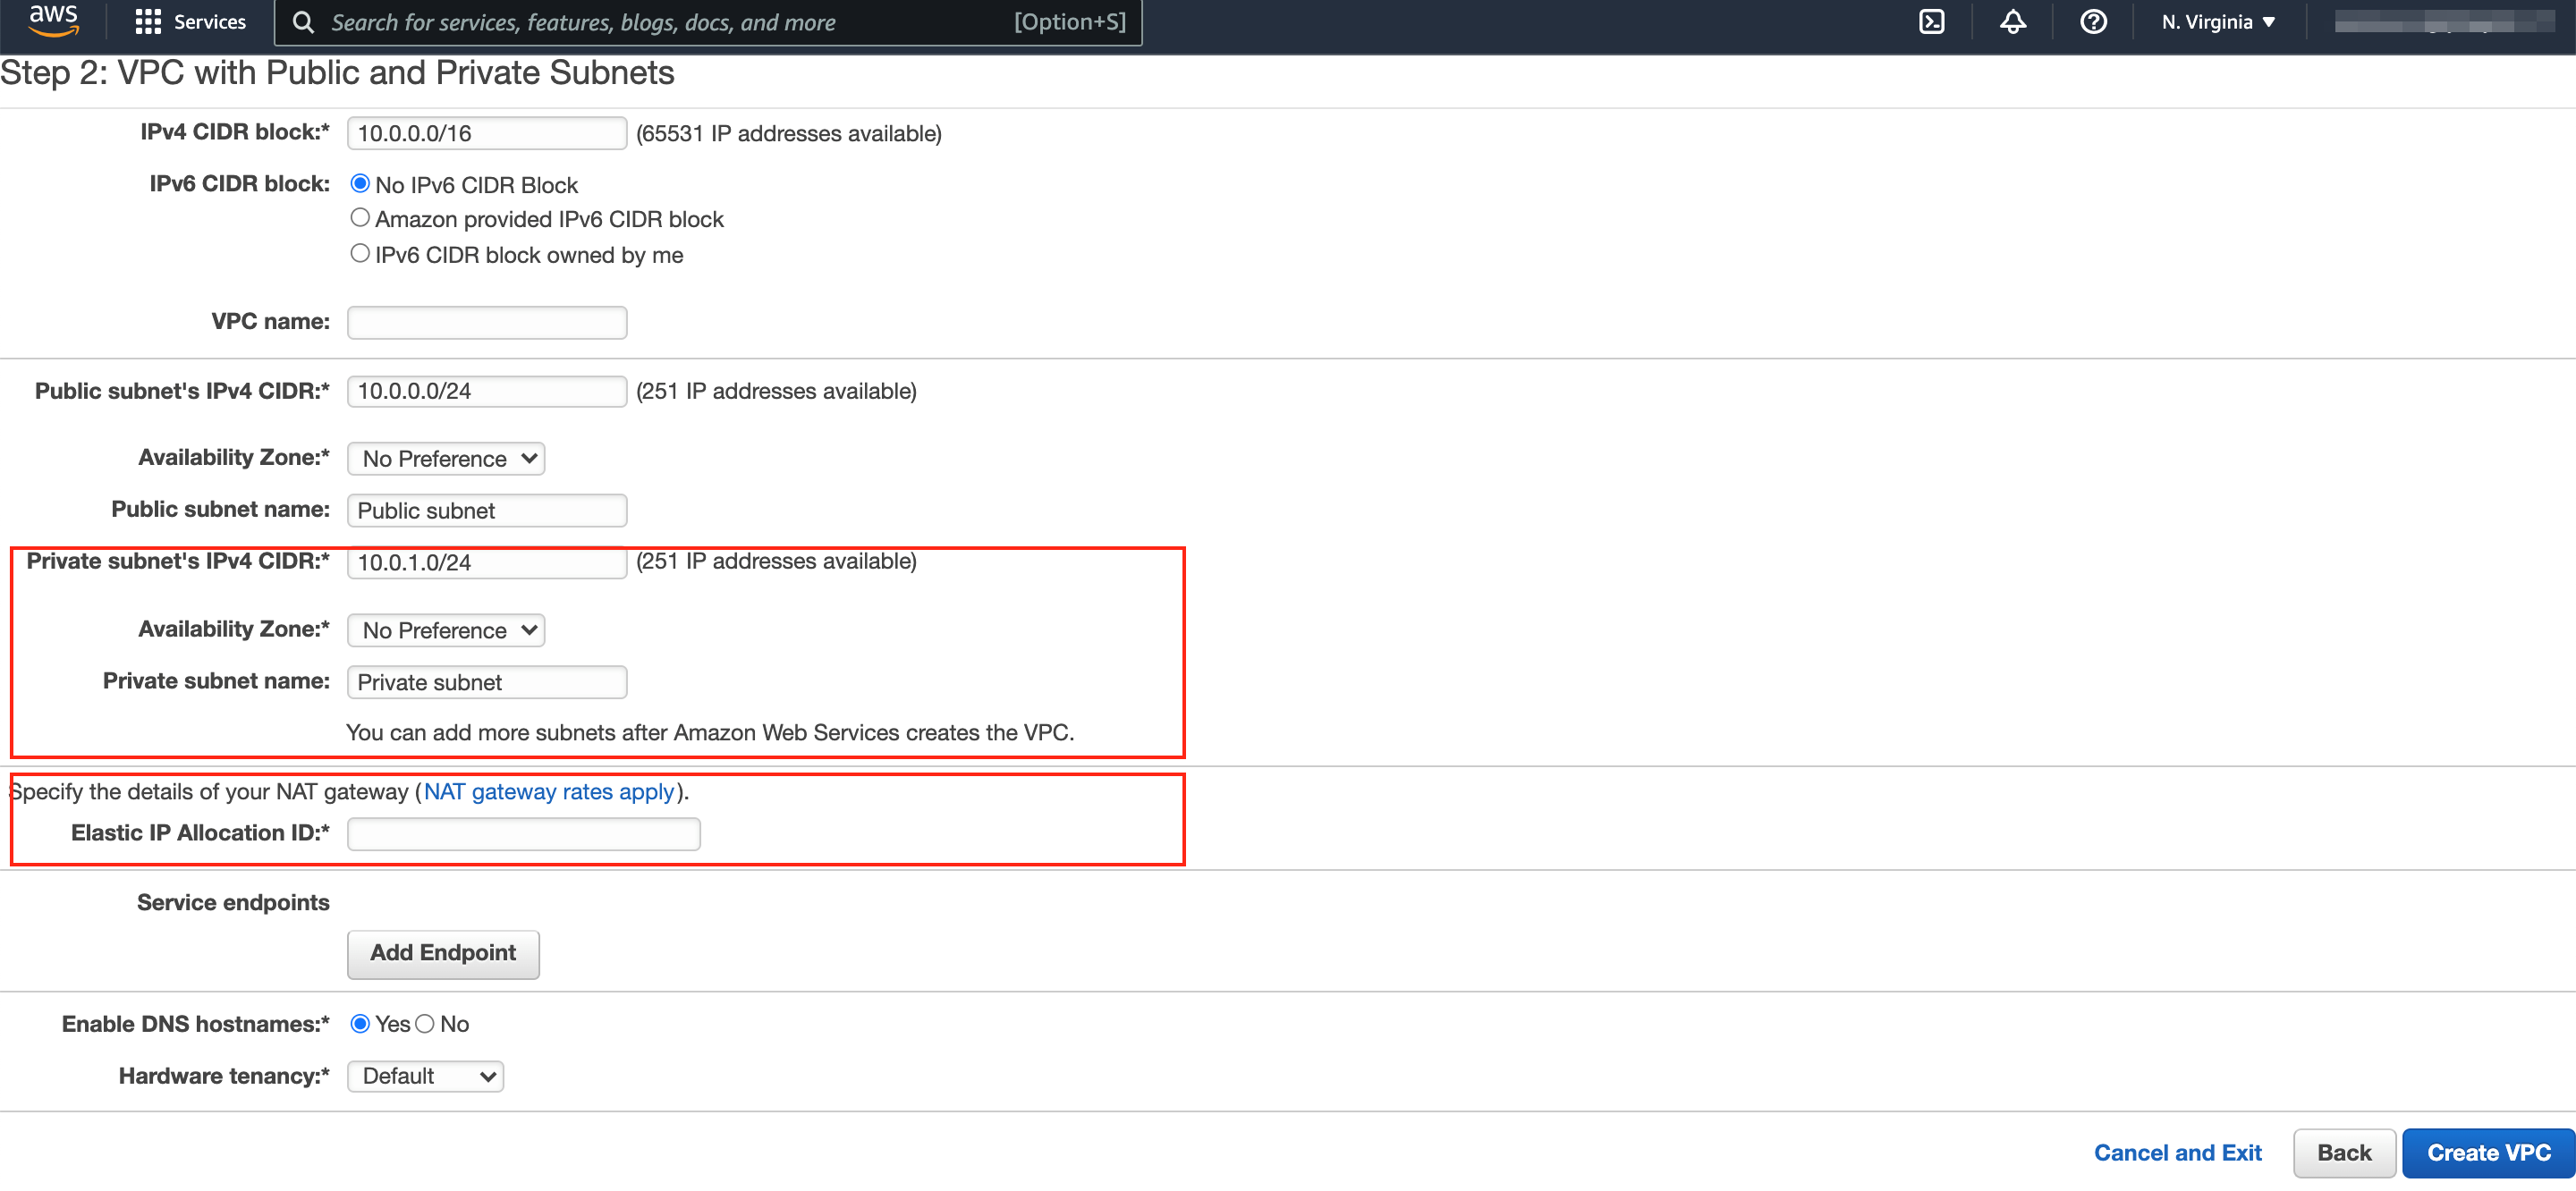
If you have chosen VPC with Public and Private Subnets, then you will get below configuration wizard. It will be similar to VPC with Public Subnet wizard, in addition you will get few additional settings for the private subnet.
- Private subnet's IPv4 CIDR: Similar to public subnet CIDR Block, we will have to CIDR Block for private subnet as well, and this also should be the subset from CIDR block at VPC level.
- Availability Zone: You can choose which Availability Zone for the private subnet.
- Private subnet name: Provide a name for the subnet that you can reference later.
- Elastic IP Allocation ID: In order to reach external services like Internet or other VPC instances from private, the traffic must route through a NAT gateway (Network Address Translation), at the time NAT gateway creation, you will be provided an Elastic IP, add that address here.
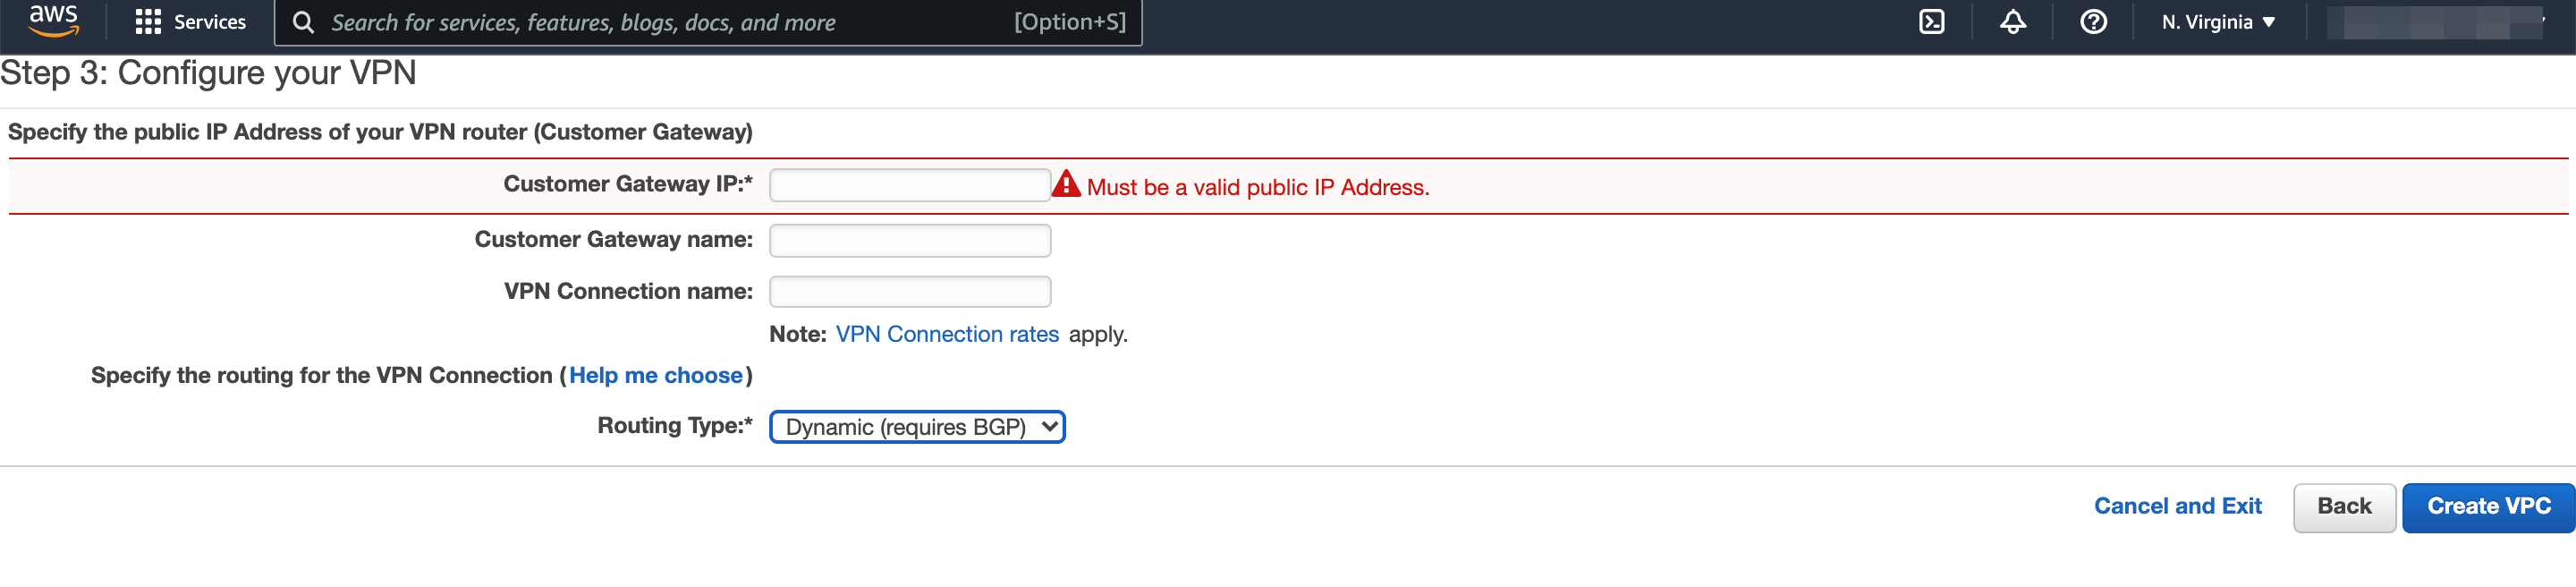
If you have chosen VPC with Public and Private Subnets and Hardware VPN Access, then you will get below configuration wizard. It will be similar to VPC with Public and Private Subnets wizard, in addition you will get few additional settings for the VPN connection in Step 3.
- Customer Gateway IP: This should be the public IP of your VPN router.
- Customer Gateway name: Provide a name for the your data center gateway.
- VPN Connection name: Provide a name for the VPN connection, so that you can reference it later.
- Routing Type: Here you can choose the routing type to be either Static - which means unchanged path between two VPN nodes, or Dynamic - meaning that it dynamically determines the best path between two VPN nodes which requires support for Broader Gateway Protocol (BGP),
If you have chosen VPC with a Private Subnet Only and Hardware VPN Access, then you will get similar wizard as VPC with Public and Private Subnets and Hardware VPN Access, except the public subnet part.