In traditional IT, procuring computing resources is extremely time consuming process and expensive too. Also, the technology is changing is so rapidly and so the demand for various applications, here are the minimal steps one would typically go through.
- Budgeting for IT resources, buying the hardware and software required.
- Capacity planning and projecting future needs.
- Deciding what type of Hardware to buy, for example, the type of Processor, Storage, O/S, Networking, RAM and so on.
Issues with this approach
- It is hard to project future need of IT resources, so you may be procuring extra hardware or less hardware, and if you ended up buying so much of extra hardware that may be sitting idle.
- Your organization or the application may have to live with this hardware for several years and may not be so easy to upgrade.
- Application design changes resulting in change of computing need in agile mode.
- Applications where the demand is unpredictable, for example some applications may have peaks usage during holiday seasons and normal usage rest of the time, so during the peak time it is important to ensure that the application can serve the volume as it may impacts organization's financials.
- Another important aspect of it is maintenance of the hardware and underlying software, like installing software patches to keep upto date with the latest.
How EC2 works How to launch an EC2 instance
AWS Elastic Cloud Computing (EC2) service provides virtual computing capacity in AWS Cloud. EC2 service eliminates the need for invest in hardware up front, so that application developrs can spent more time on application development rather than on infrastructure needs and take your application faster to the market.
- With EC2, you can launch as many instances as you want.
- You can scale up when there is a spike in demand and scale down if no demand is back to normal and this type of scaling can be automated using this feature you don't need to forecast the future traffic.
- Flexible in choosing the components, like type of storage, RAM, processor and O/S etc when selecting an EC2 instance.
- You can configure security and networking to meet the standards.
-
There are several different plans and pricing options available that
you can choose from depends on the need, for example On-Demand instances, Spot instances, Dedicated hosts, Saving plans etc.
This link has more details on pricing
https://aws.amazon.com/ec2/pricing/
There are two different ways to launch an EC2 instance from AWS console.
- Using 'Launch instance' wizard
- Using 'Launch instance from template' wizard
- To create an EC2 instance, navigate to EC2 dashboard from AWS Console and click on Launch instance option.
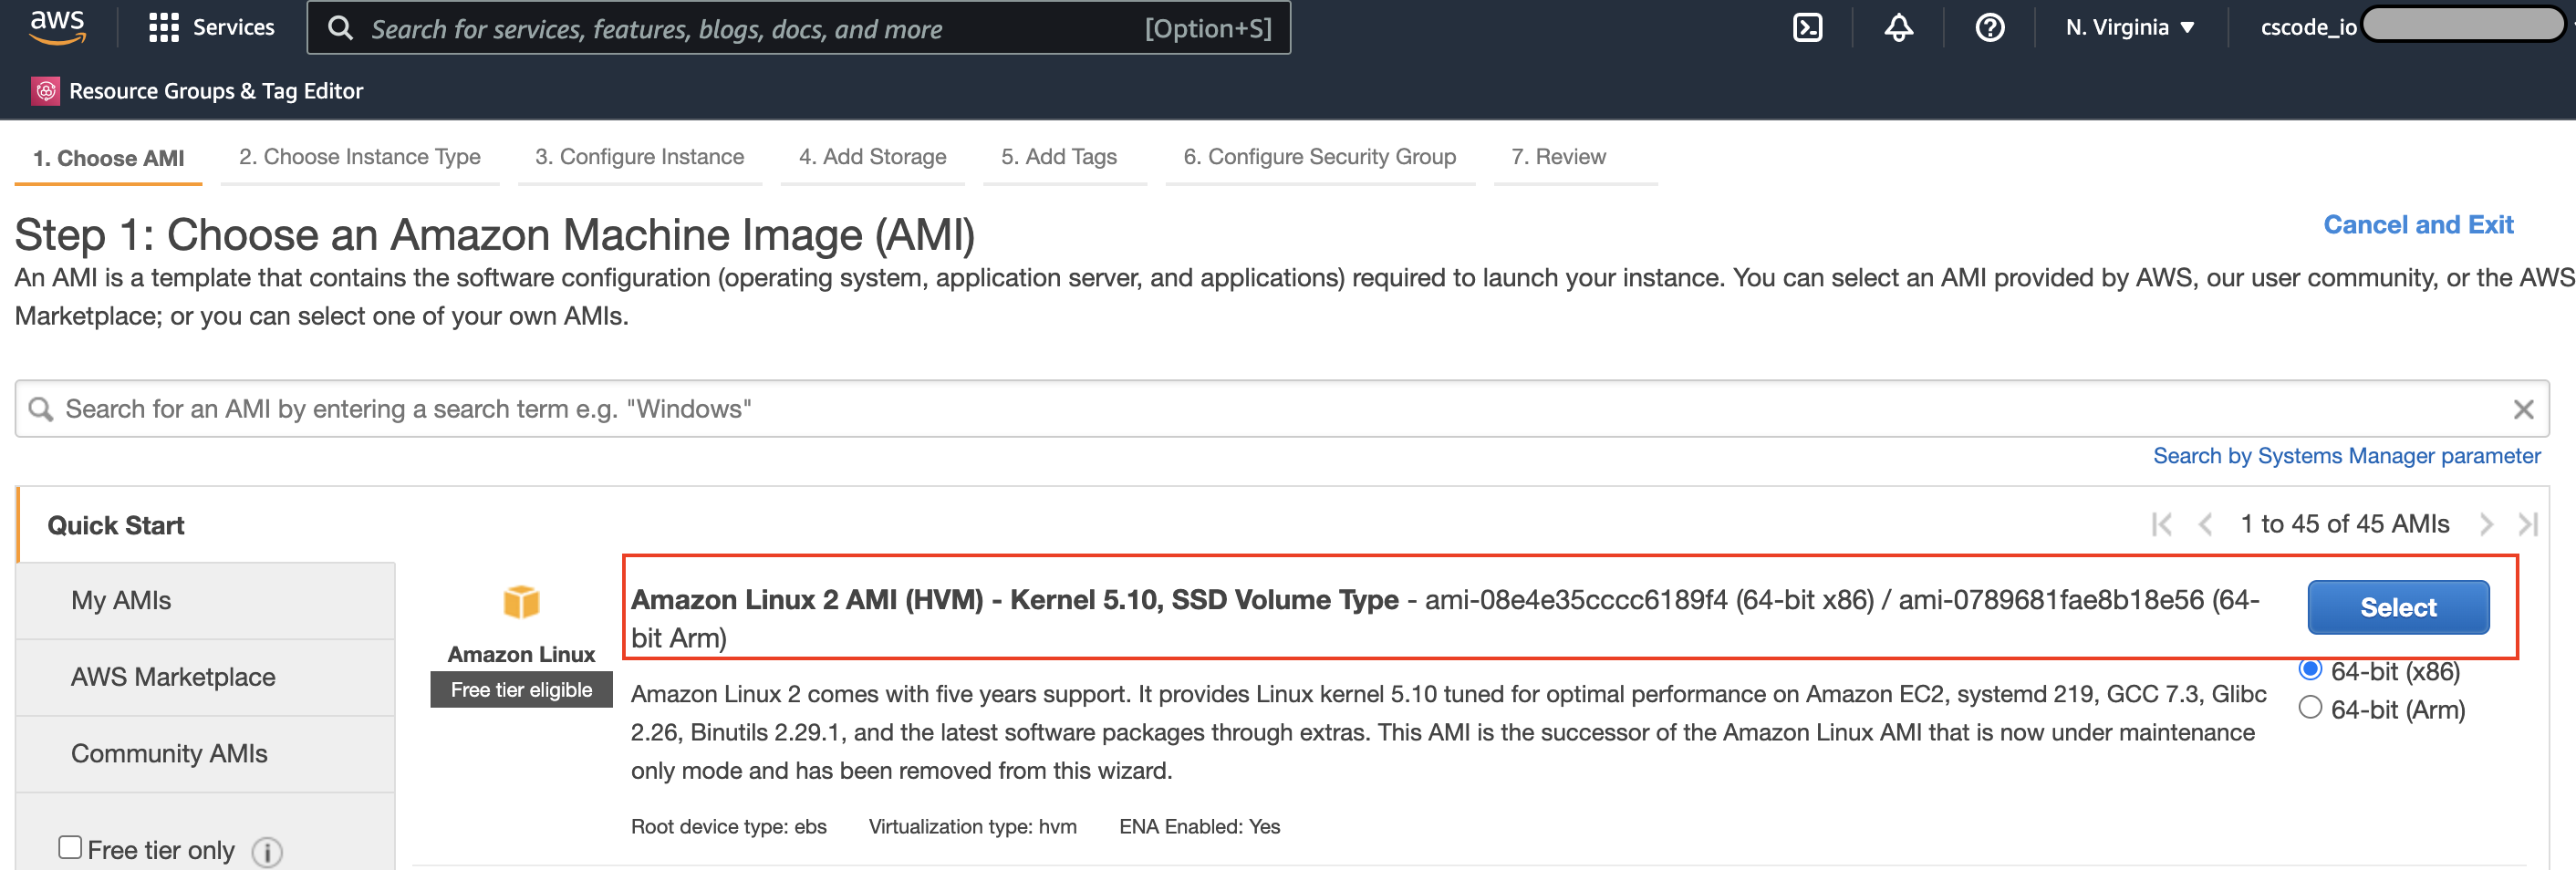
- In the next step, choose an AMI (Amazon Machine Image) which is nothing but O/S image, like Linux, Windows or macOS etc. and any other pre packaged software packages that you want for the EC2 to start with. There are plenty of AMIs available on AWS marketplace you can choose from, some of them are free and open source and some of them are paid. You can also choose your own custom AMIs.
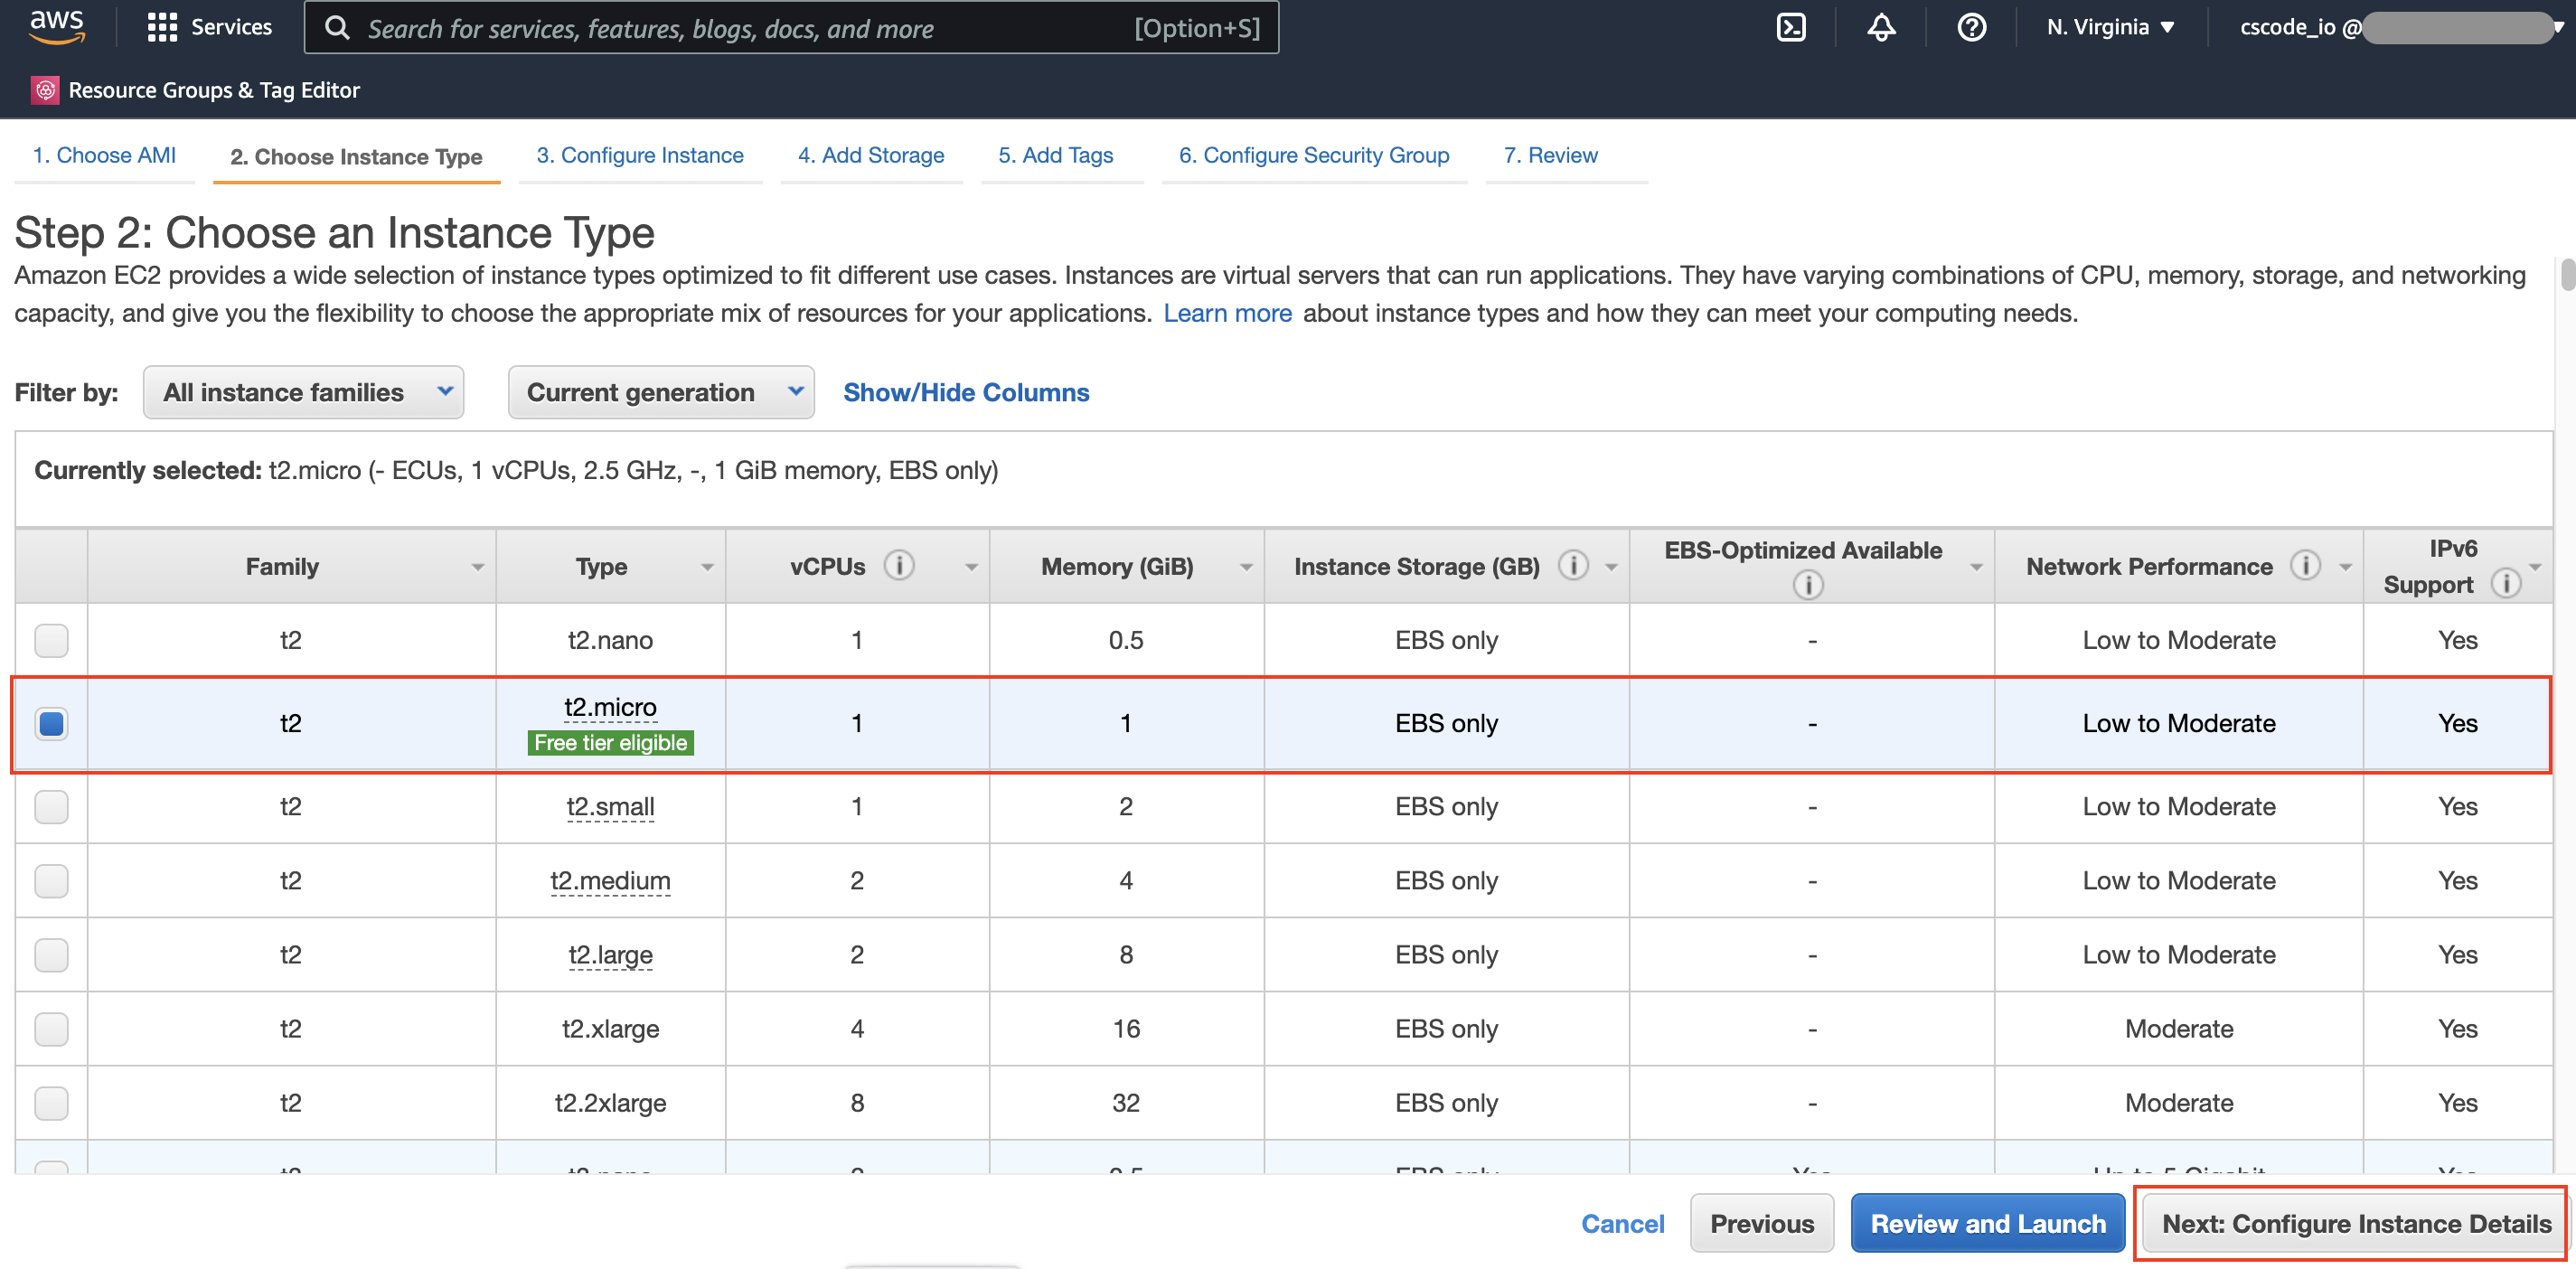
- In the next step, we have to choose the instance type, this is nothing but the configuration you want for the EC2 instance which includes type of processor, number of vCPU's (virtual CPUs), GPUs, memory for RAM, network bandwidth speed, default storage etc.
- In this step, you can configure sevaral settings related to tenancy, networking, IAM roles, and behavior of the system. Some of the settings cannot be changed once EC2 is created and some of settings can be modified at a later stage such as IAM roles for this EC2 instance.

In this article we are going to choose Amazon Linux 2 AMI, but you can choose the AMI that you wish to choose.
What you will see here is, instance family such as t2, t3, m4, m5, m5a ... so on, these meant for different purposes of computing workloads, for example for small scale applications you may need reasonable number of CPU cores, RAM etc. but for processing and memory intensive applications you may need a bigger size in configurations.
Within each family we will have sub types such as nano, micro, small, medium, large, xlarge, 2x large... so on,
these combinations comes with predefined configuration of processor type, RAM etc.
for full list of upto date instance types available and its configuration you can check in this link
In this article we are going to choose t2.micro, which comes with 1vCPU and 1Gig RAM and moderate Network performance and click on Configure instance details.
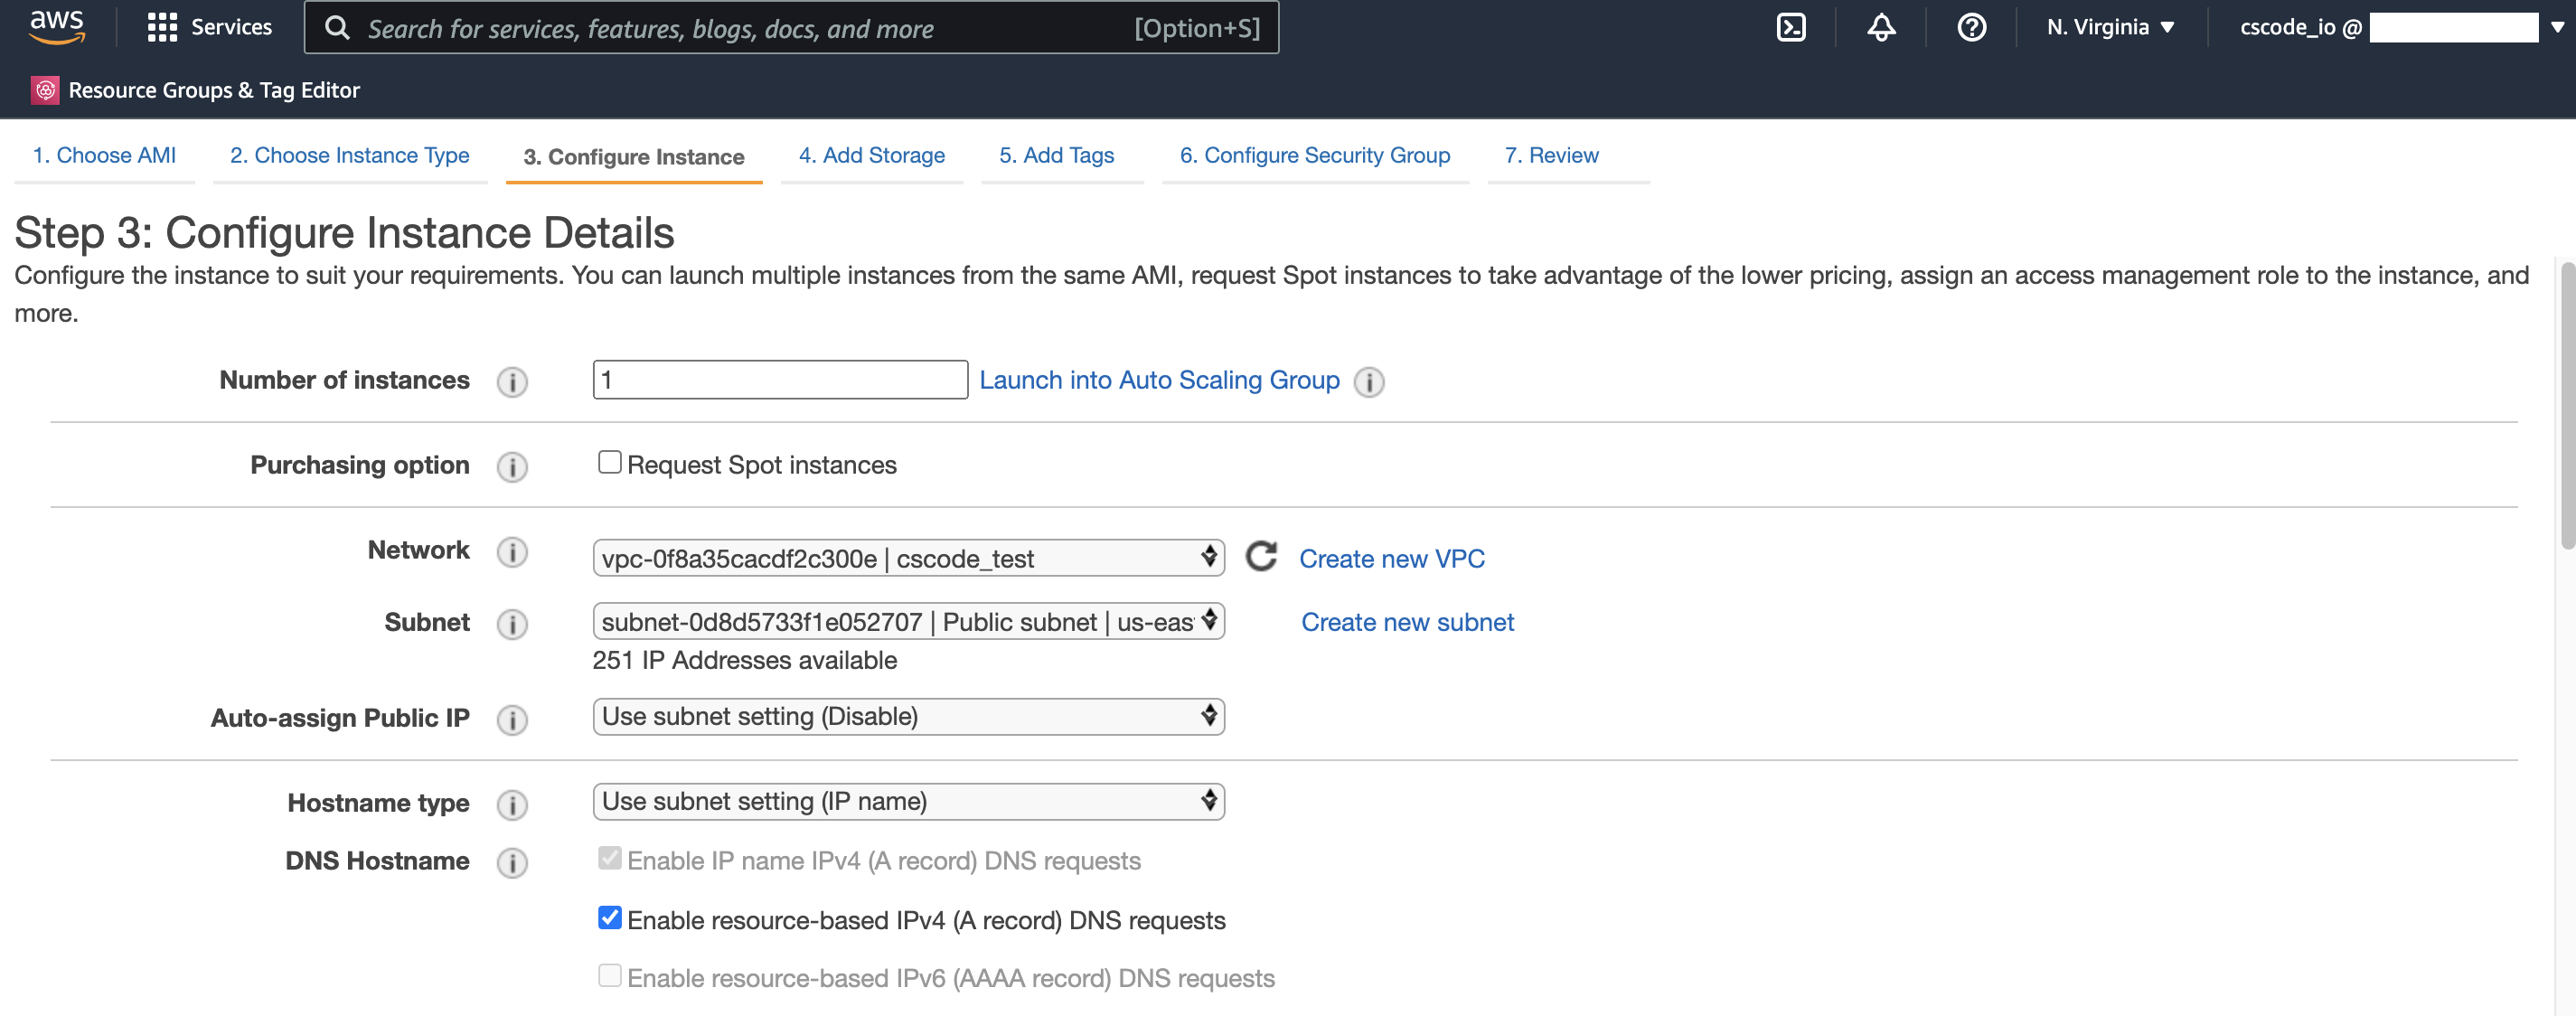
- Number of instances: You can choose to launch more number of instances with same configuration if you wish.
-
Purchasing option: If you wish to choose Spot instances, you can select this option.
Spot instances are special type of EC2 instances where you can bid for a price that you are willing to pay, if the instances are available when needed AWS will allocate that to you, but if someone else bids with higher price, and if there there are no available instances to serve that higher bidder, AWS may terminate your instance and give it to higher bidder. So, this is a very economic option and may suit best for some applications if losing instances in the middle of something is not an issue, and this may not be a suitable option for applications which cannot lose any data in the middle of running the instance. - Network: Choose the VPC name where you want to place this EC2 instance, you can either choose the default one that gets created when you signup in AWS or create a new one, refer to this article if you want to create your own VPC.
- Subnet: Choose the subnet within the VPC where you would like to place this EC2 under, If you have multiple subnets for different purposes like public subnet for internet facing or private subnet for non internet facing etc. choose the right one.
- Auto-assign Public IP: If you enable this, then it requests a public IP address from Amazon's public IP address pool, to make your instance reachable from the Internet. In most cases, the public IP address will be associated with the instance until it’s stopped or terminated, after that it’s no longer available for you to use, it will go back to AWS public IPs pool. If you want a dedicated static public IP address that you want to associate with the EC2, use an Elastic IP address (EIP) instead. You can allocate your own EIP, and associate it to your instance after launch.
- Hostname type: Hostname can either be IP name based on resource name based.
- DNS Hostname: This setting is to tell whether resource-based IPv4 DNS determines if requests to your resource name will resolve to the IPv4 address of this EC2 instance. IP name IPv4 DNS determination is enabled by default.
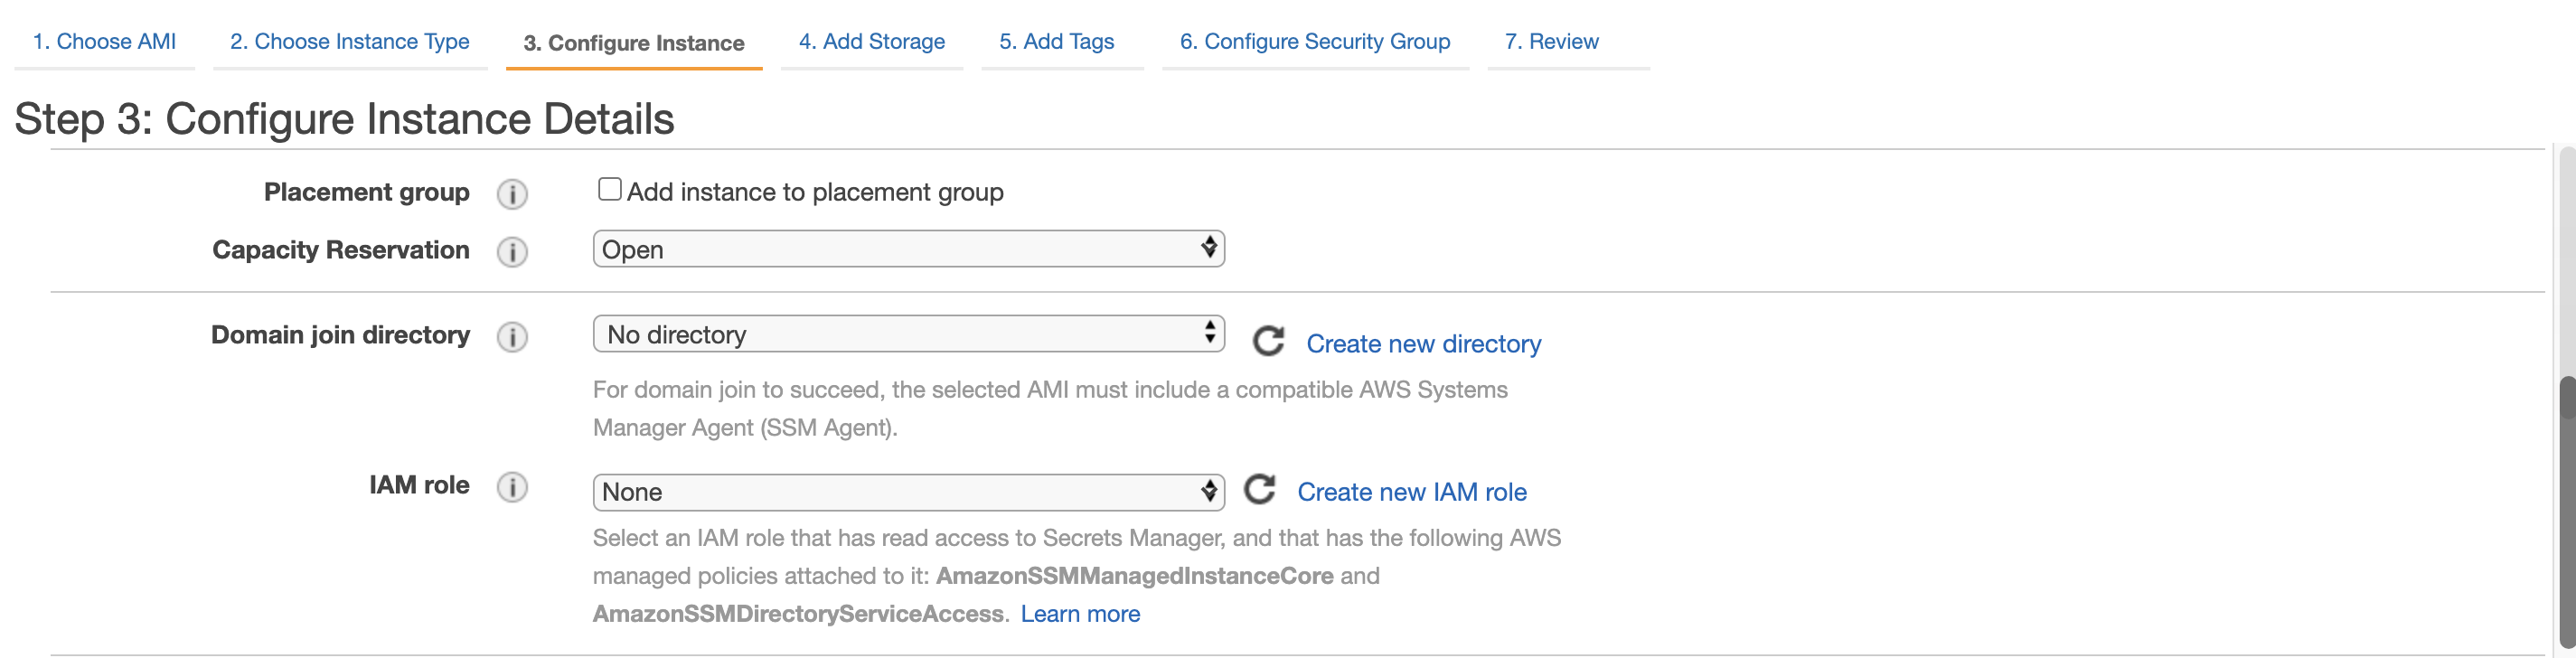
- Placement group: Add this EC2 instance to a placement group if you have any in place already. Placement groups are nothing but strategies you can create in AWS to place EC2 instances such that they can benefit from features such as low-latency networking etc. Refer to Placement groups article.
-
Capacity Reservation: Capacity Reservations reserve capacity for your EC2 instances in a specific AZ (Availability Zone).
You can launch instances into a Capacity Reservation if they have matching attributes (instance type, platform, and Availability Zone),
and available capacity. You can choose the options Open, Target by group, Target by ID or None.
'Open' means that the Capacity Reservation automatically place this EC2 instance into reserved capacity based on matching attributes - instance type, platform, and Availability Zone.
'Target by group' or 'Target by ID' - means that the Capacity Reservation matches the attributes - instance type, platform, and Availability Zone, plus the target provided. - IAM role: An IAM role automatically deploys AWS credentials to resources that assume it. You can select the instance profile that contains the required IAM role. If you created your IAM role using the console, the instance profile has the same name as your IAM role.
To know more on how to create a Capacity Reservation - go to this article Capacity Reservation
To know more on how to create a IAM roles - go to this article IAM (Identity Access Management)
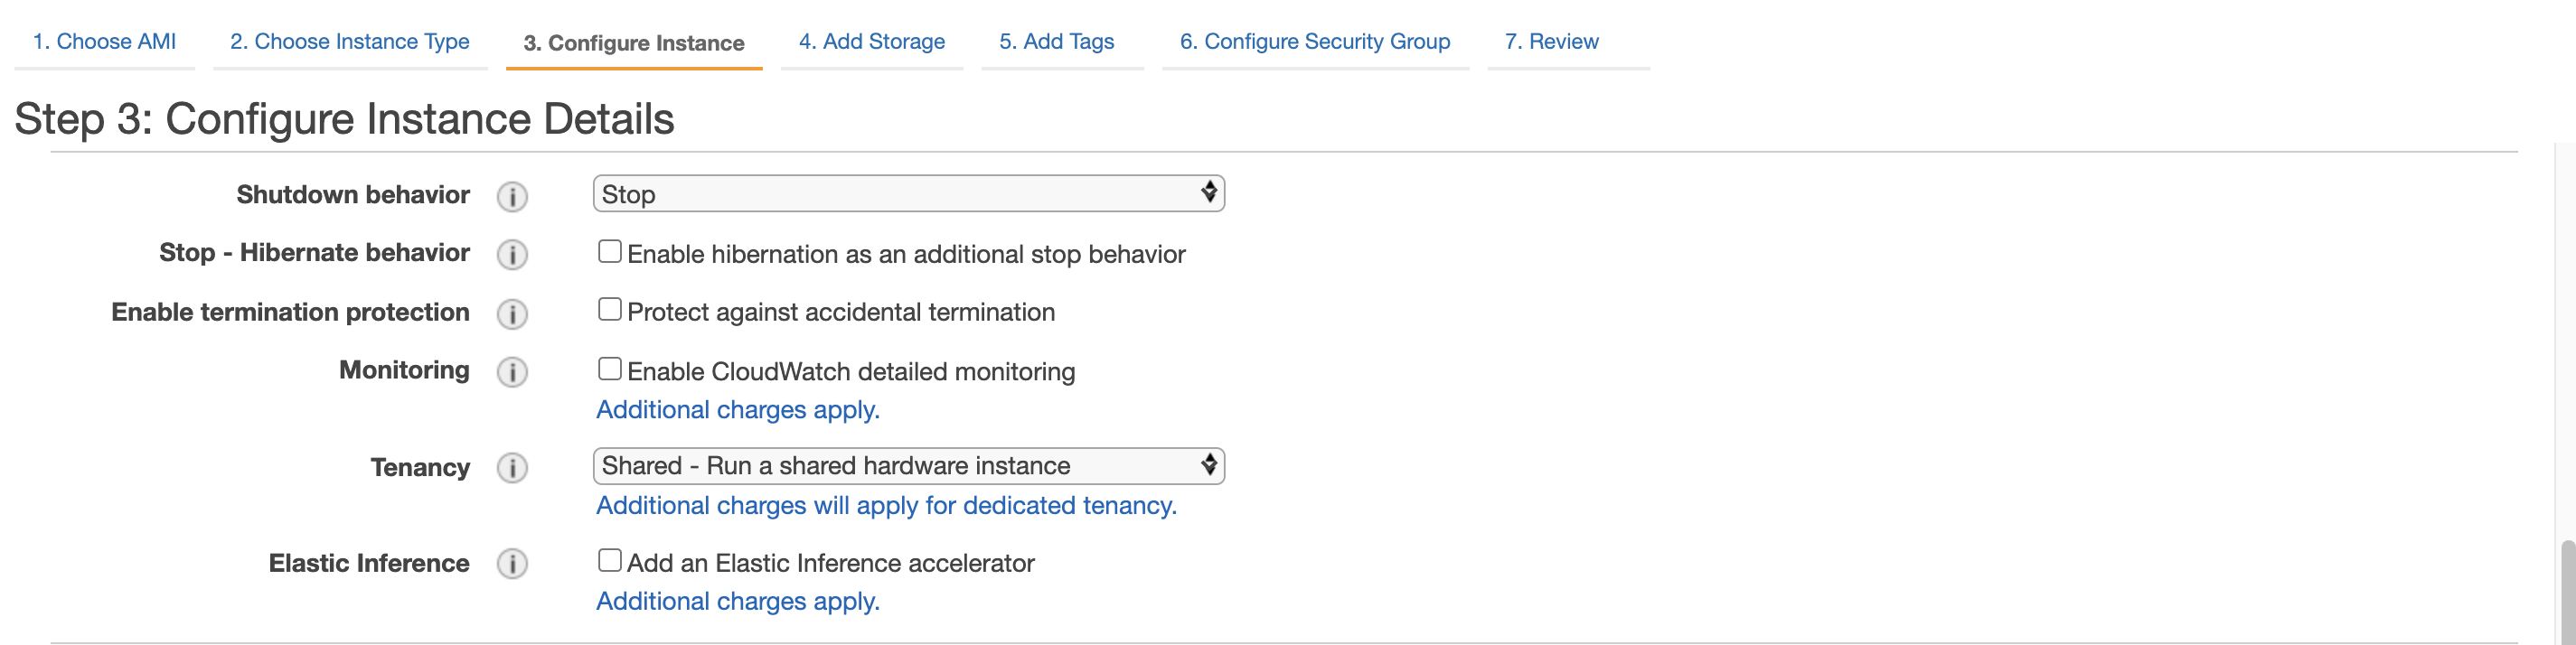
- Shutdown behavior: Choose an option whether you want to stop the EC2 instance when you shut down the system or terminate the EC2 instance. If you terminate you will lose it forever and you may lose the data as well.
- Stop - Hibernate behavior: Check this option if you would like to add Hibernate as an additional stop behavior.
- Enable termination protection: Check this option if you would like to have an extra layer of security in case if you terminate EC2 instance by mistake. By choosing this AWS will not let you to terminate the EC2 instance until you disable this option.
- Monitoring: Select this option if you would like to send EC2 instance metrics and monitoring data over to CloudWatch. The default behaviour of collecting the stats is free and it pushes the data every 5 minutes, you can enable more advanced monitoring where data will be refreshed every 1 minute.
- Tenancy: You can choose whether you want to run EC2 instances in a shared hardware instance or dedicated hardware.
- Elastic Inference: This option provides cost efficient hardware acceleration for deep learning inference for all EC2 instance types, at a fraction of the cost of standalone GPU instances.
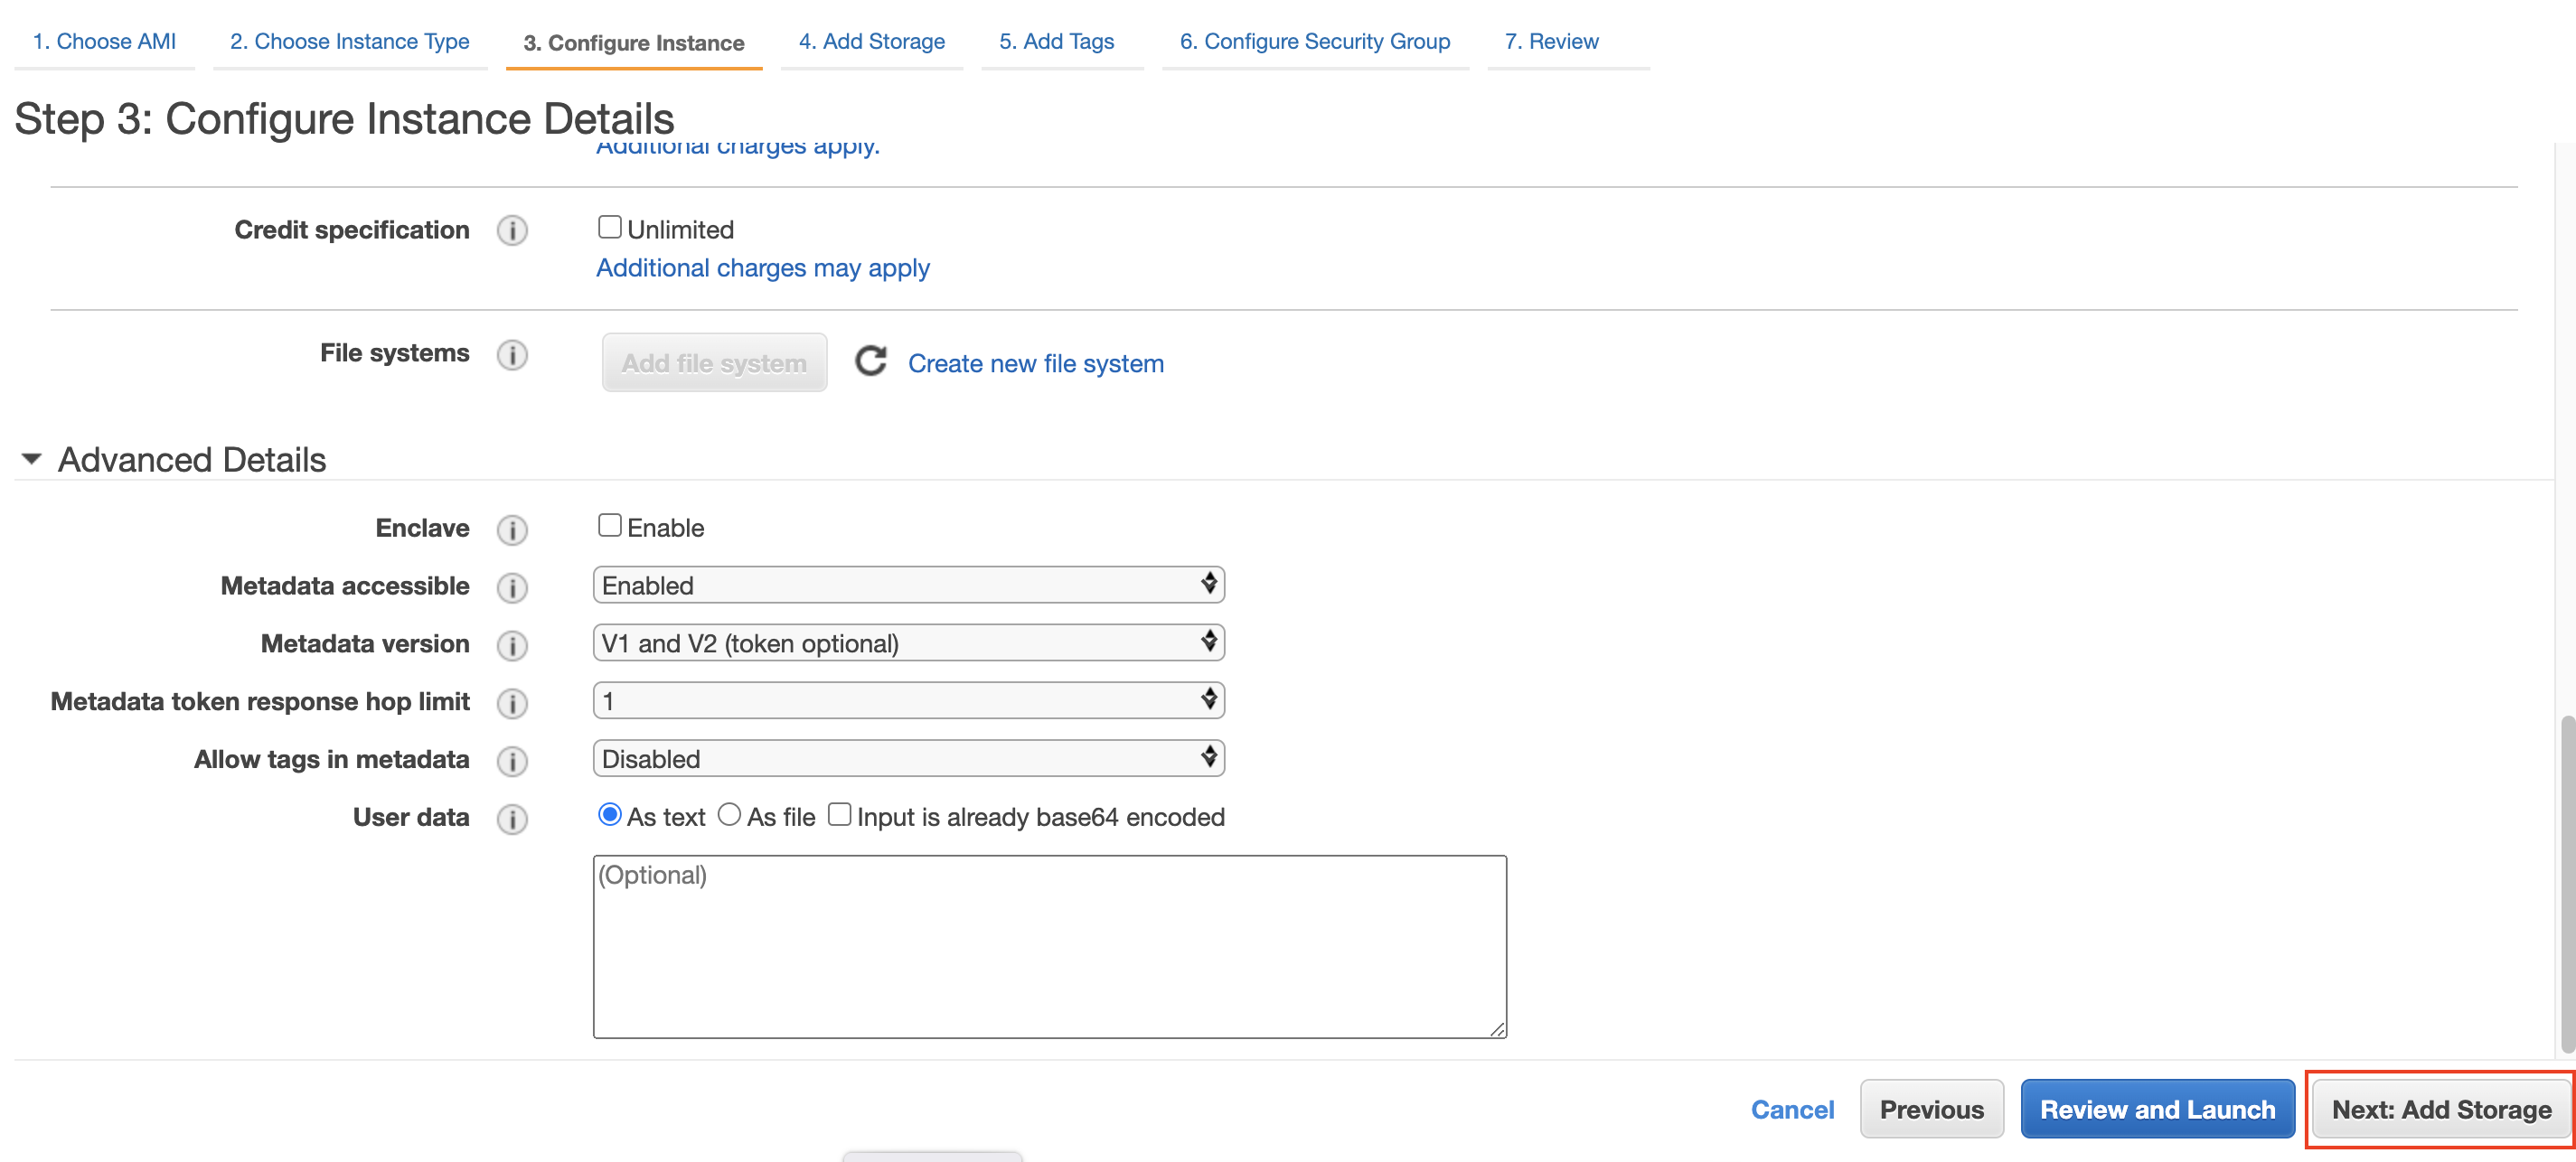
- Credit specification: If you select this checkbox 'Unlimited' - allows applications to burst beyond the baseline for as long as needed at any time. If the average CPU utilization of the instance is at or below the baseline, the hourly instance price automatically covers all usage. Otherwise, all usage above baseline is billed.
- File systems: You can specify EFS file systems to mount to your instance. This is a network file system, so file system you are going to use must have a security group that allows inbound access for the TCP protocol on the NFS port from the EC2 instance, and the EC2 instance must have a security group that allows outbound access to the mount targets on the NFS port.
-
Enclave: This option enable you to creare isolated compute environments to further protect the data,
and securely process highly sensitive data within your Amazon EC2 instances. For more info on Nitro Enclave,
read this article on AWS
https://docs.aws.amazon.com/enclaves/latest/user/nitro-enclave.html - Metadata accessible: You can choose whether to allow EC2 instance meta data accessible via HTTP endpoint or not.
- Metadata version: Meta data API version endpoints to enable.
- Metadata token response hop limit: The number of network hops that the metadata token can travel. Default is 1. Maximum is 64.
- Allow tags in metadata: Whether to allow EC2 instance tags to be allowed as Meta data or not.
- User data: You can specify scripts or configuration to run upon launching EC2 instance, for example you can commands to install necessary software packages or configure the system or add environment variable etc.
Once you have chosen all the options as necessary to meet your specific needs, click on Add Storage
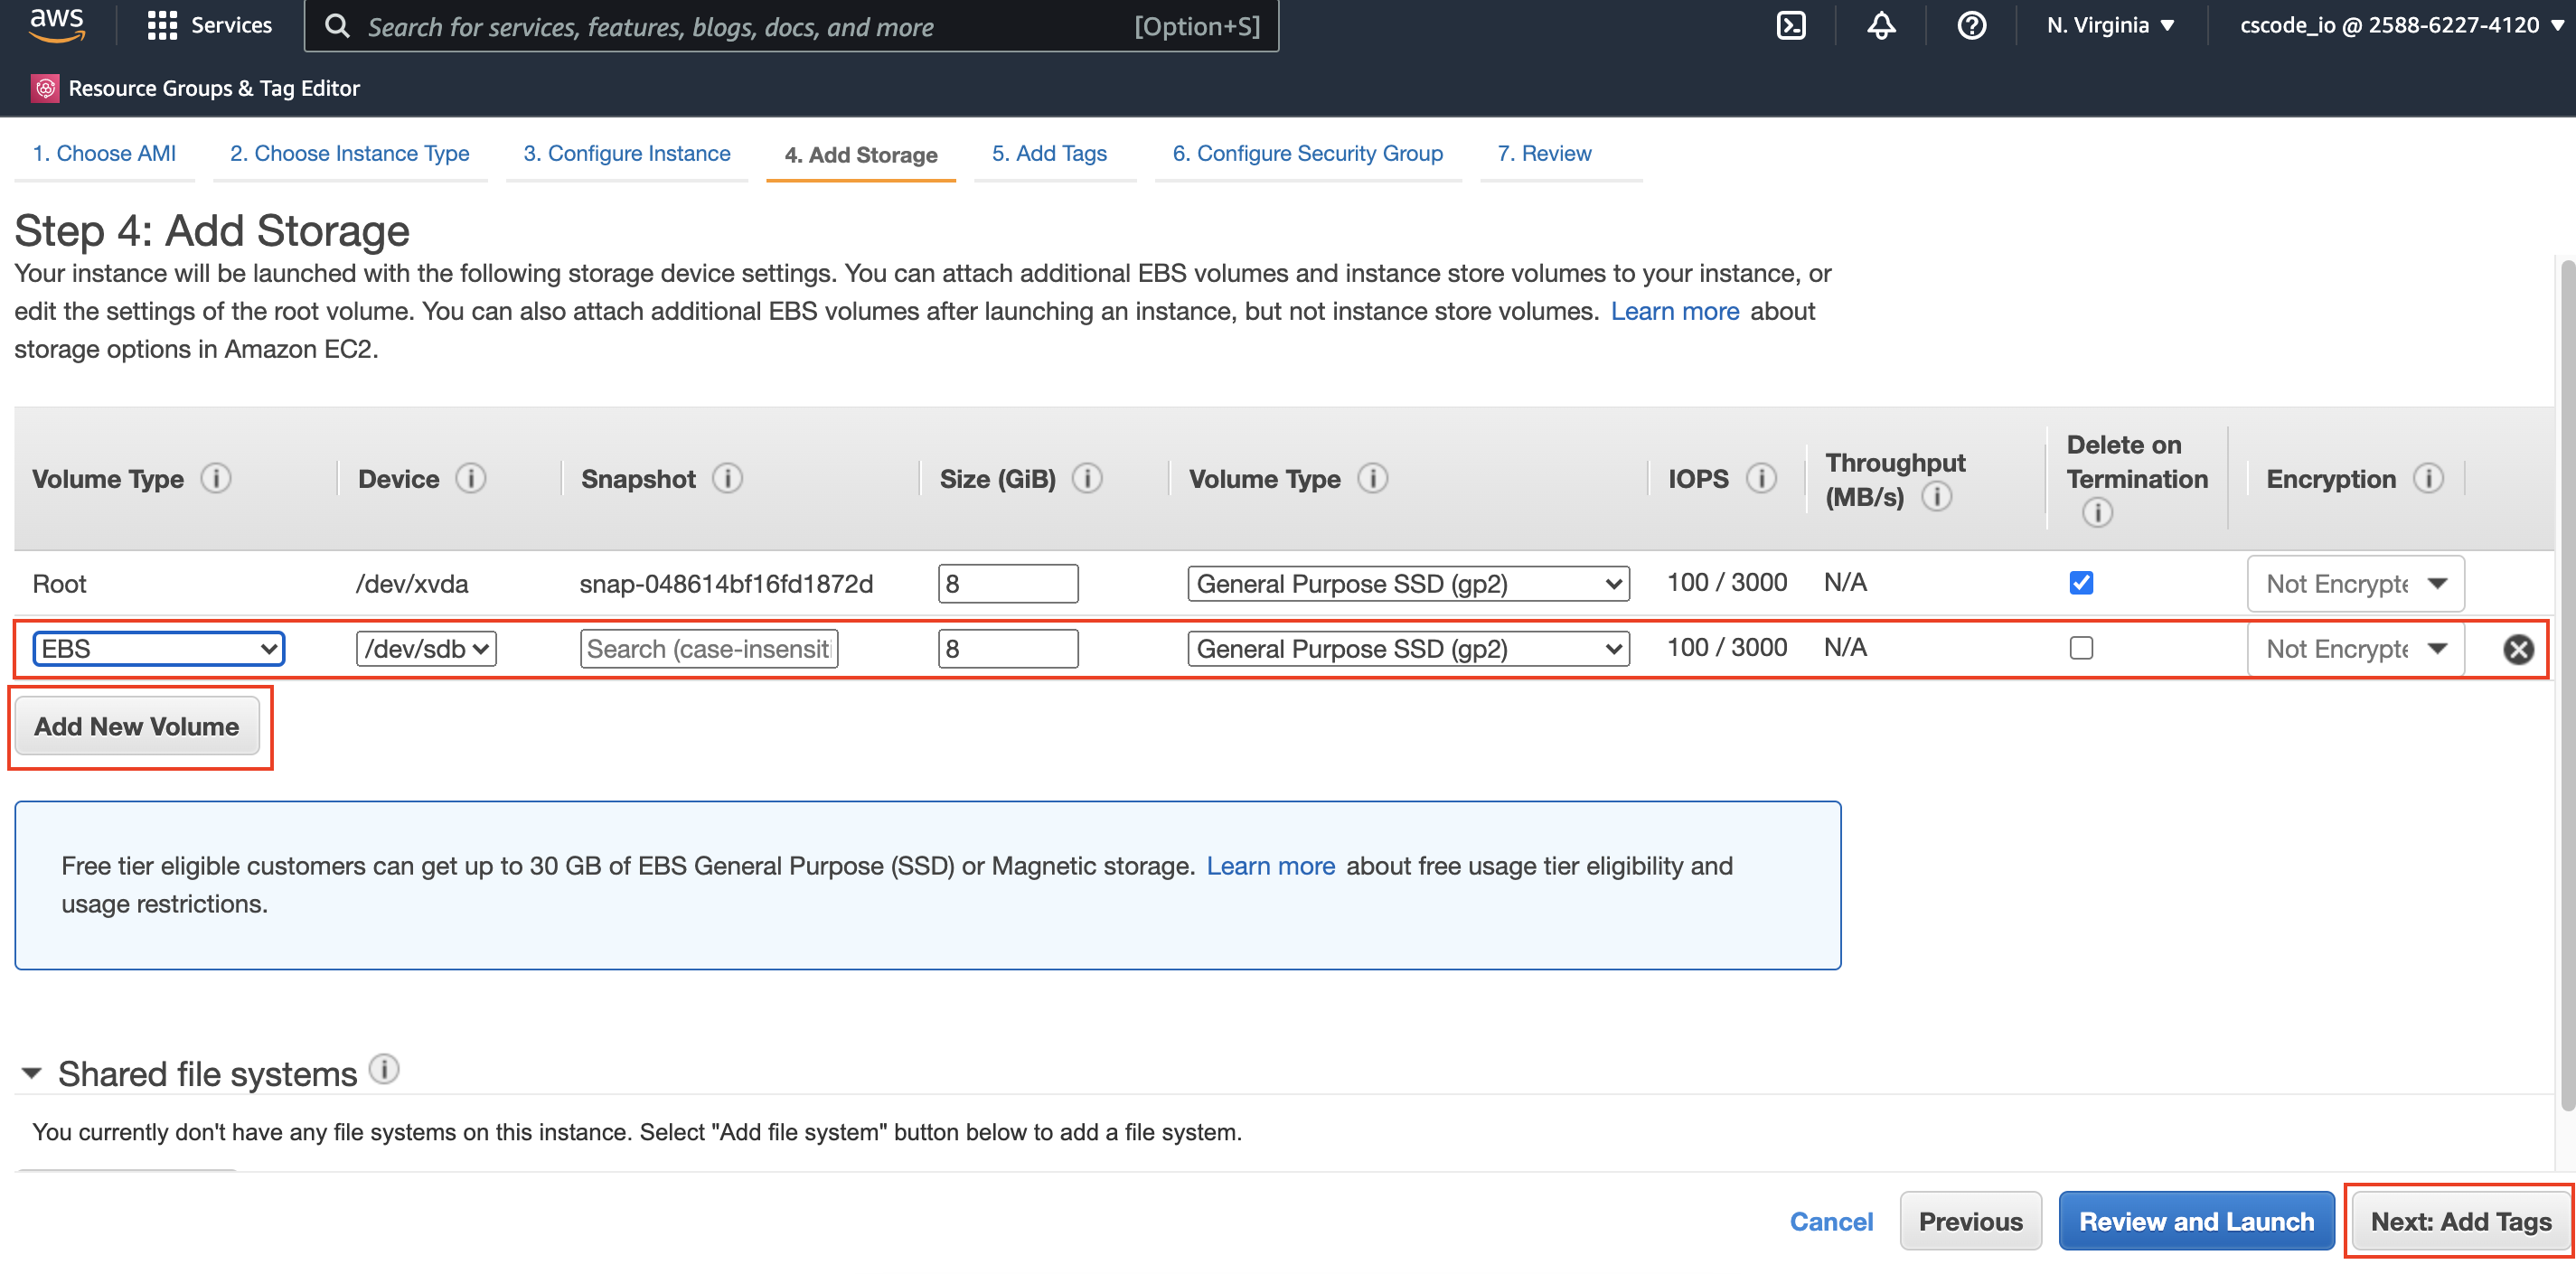
- In the next step, choose additional EBS volume storage as needed, EBS volumes are attached to the EC2 instance, so you will get good throughput. You can use EBS storage for following use cases.
- To keep application artifacts such as JARS, configuration files, and other run time software packages.
- If you want keep temporary data such as intermediate processing results of your application that you can always re-compute in case if the system is crashed. If you cannot lose this data, then consider using EFS file system, which is a network file system in AWS that you can configure in previous step File system, or use Database.
You can select the options for EBS to meet your need.
- Device: The available device names for the volume. The options what you will get here depends on the AMI that chose in the first step. Some AMIs may create symbolic links to the name you specify in case if the device attached with different name that what you specify.
- Snapshot: If you want to create a volume using a snapshot that is available in S3 buckets, you can specify the snapshot id here. you automatically get several public snapshot ids that are available to use or you can create one for your use case. A good example usecase would be, you can prepackage application files that you need and prepare a snapshot and store them in S3, you can simply re-use that snapshot here.
- Size (GiB): specify the size for the volume in Giga Bytes.
- Volume Type: Choose the volume type that you want to use, such as SSD, Magnetic tape storage etc.
- Delete on Termination: You can select this option if you want to delete the volume when you terminate EC2 instance, and if you want to retain the volume for any other purpose like auditing or back needs, you can uncheck this box.
- Encryption: In this option, you can select the KMS (AWS's Key Management Service) key to use for encryption if you want to encrypt the data on the file system.
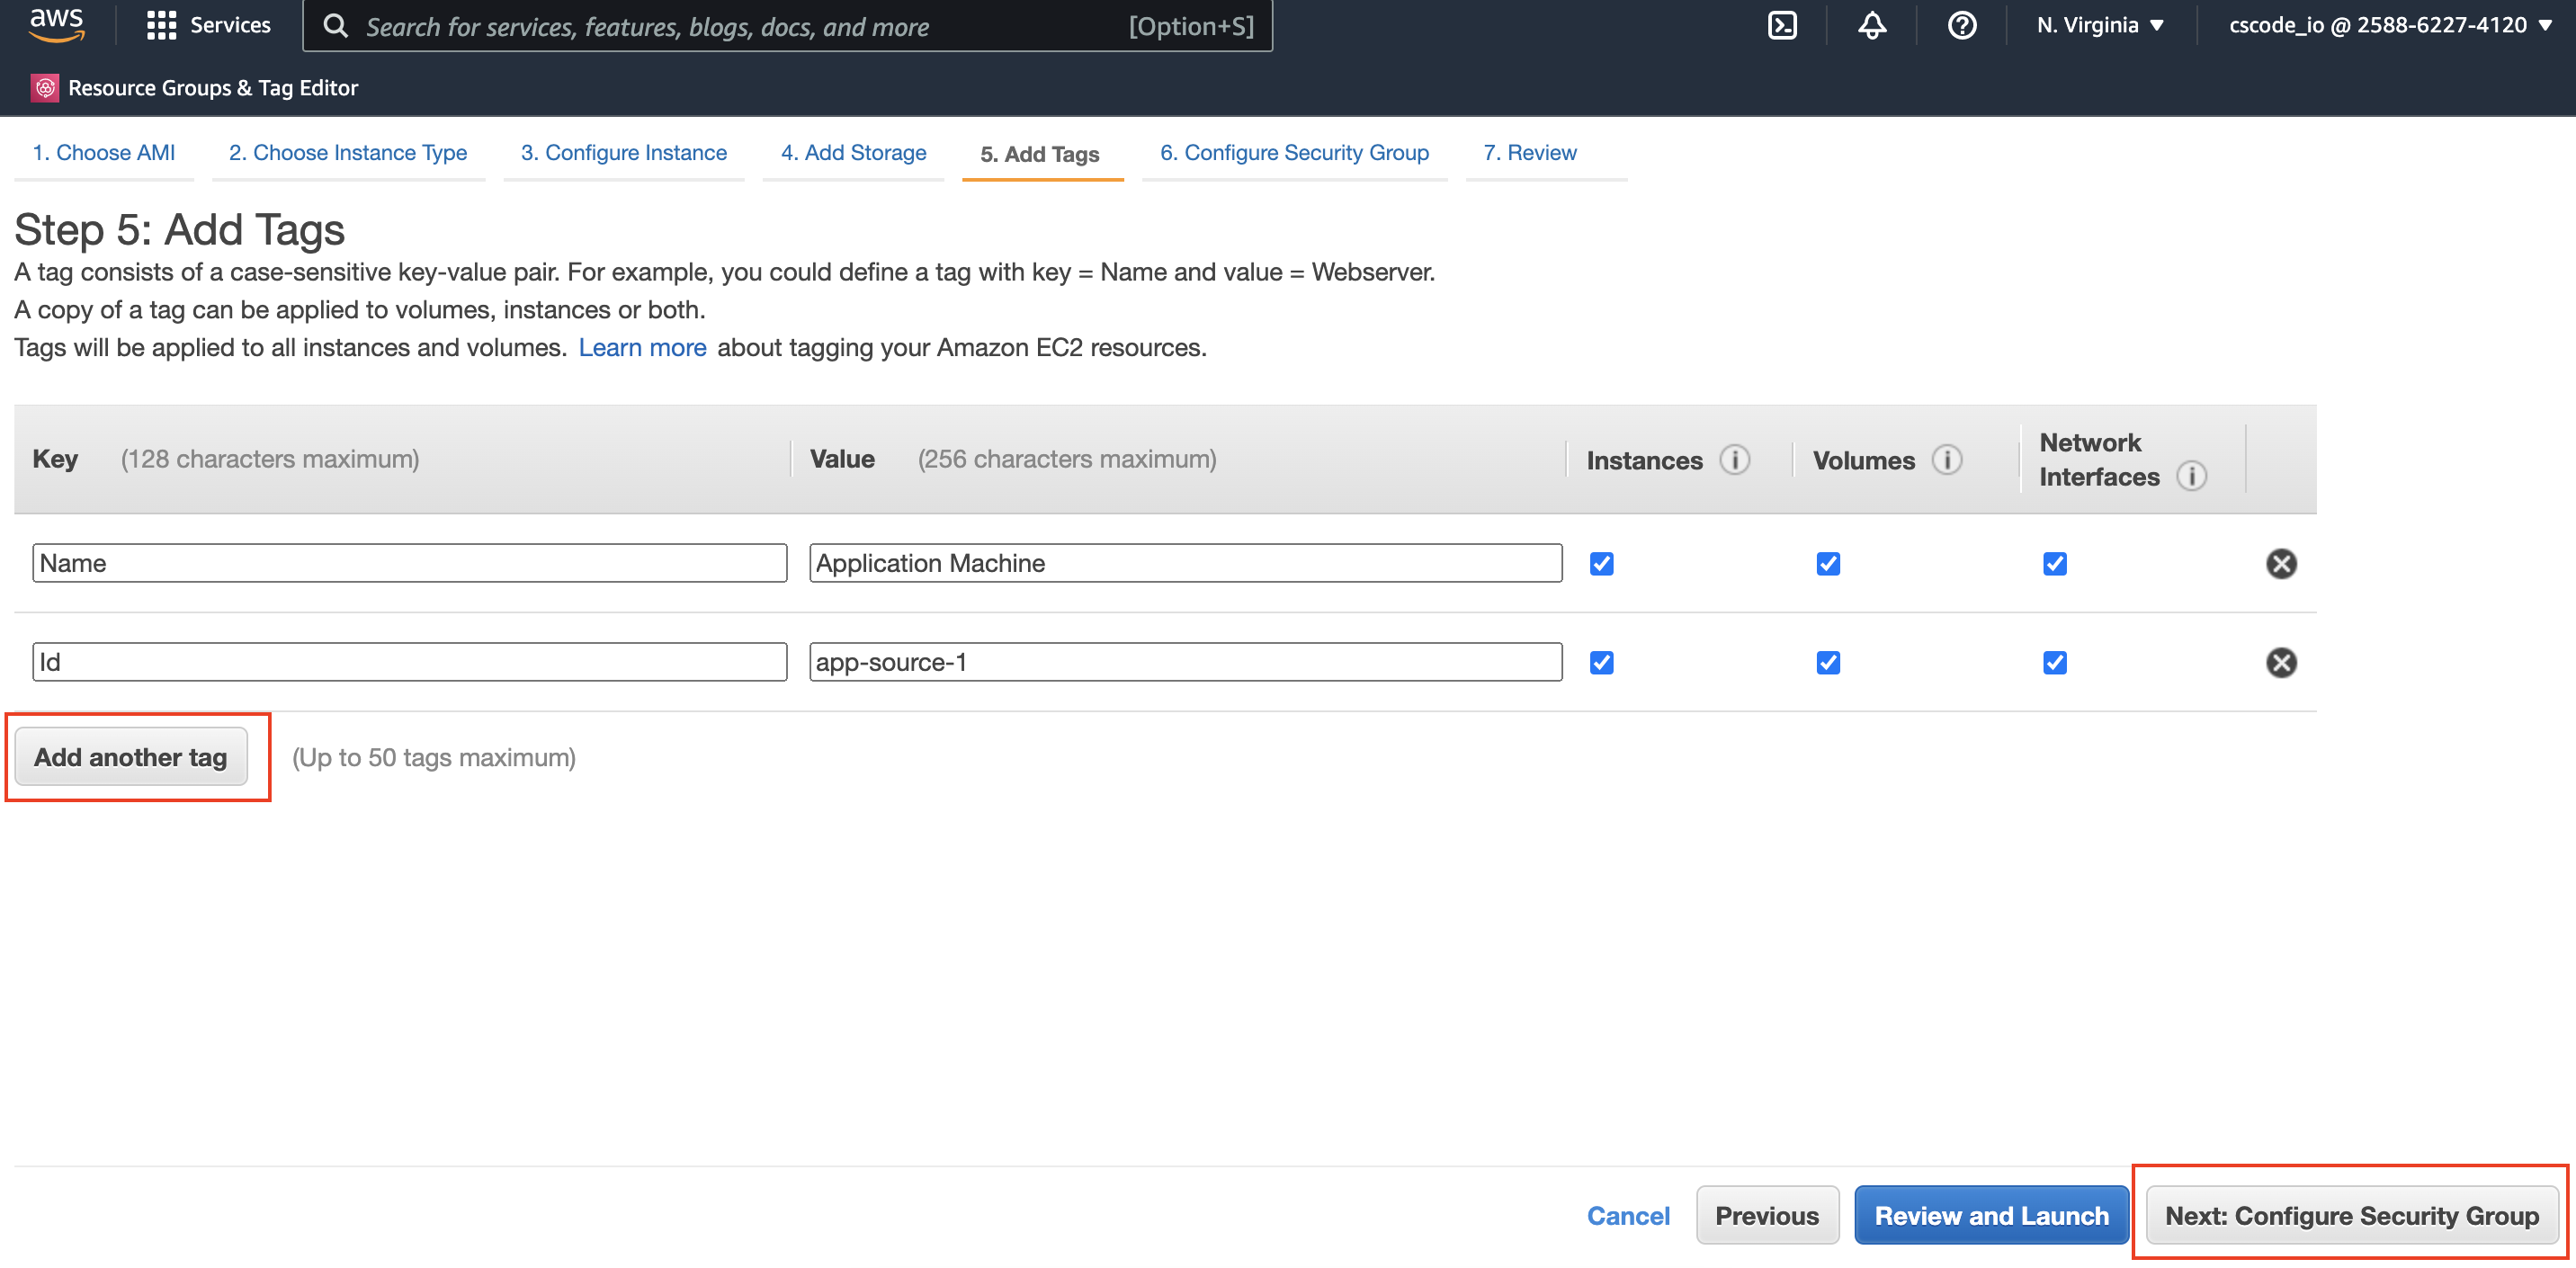
- In the next step, add any tags if you wish to add, Tags are helpful or organize resources.
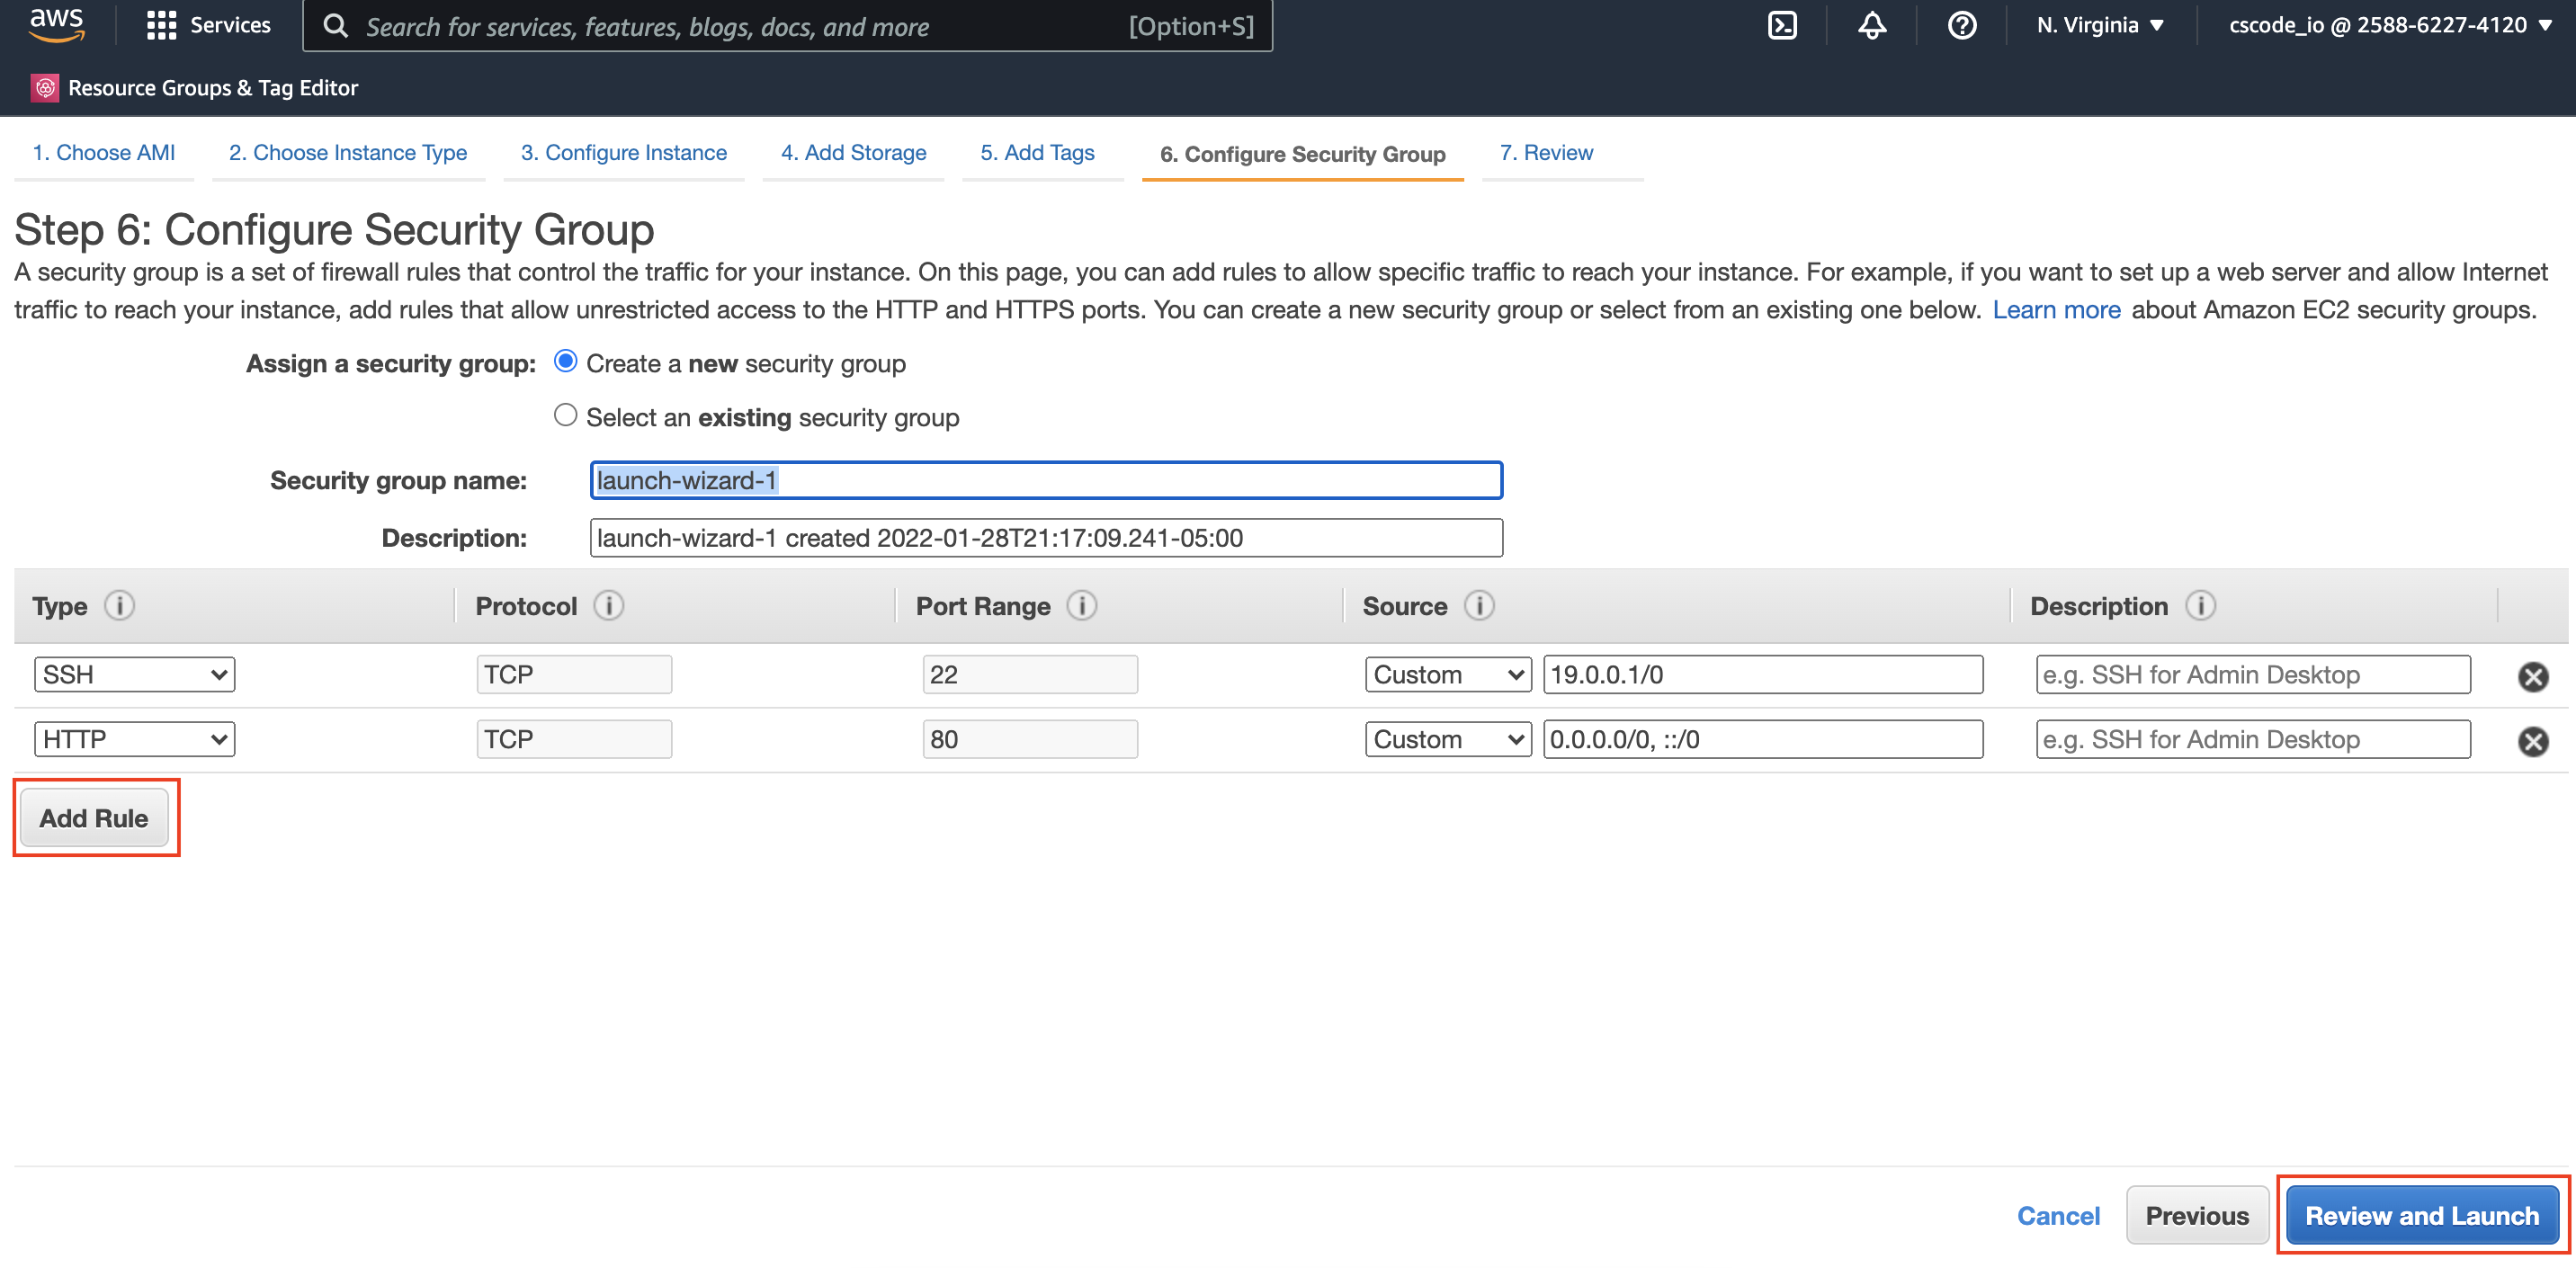
- This is an important step, you can configure security group for the EC2 instance here, you can define inbound and outbound firewall rules here. For example you can restrict who can access this EC2 using IP address etc.
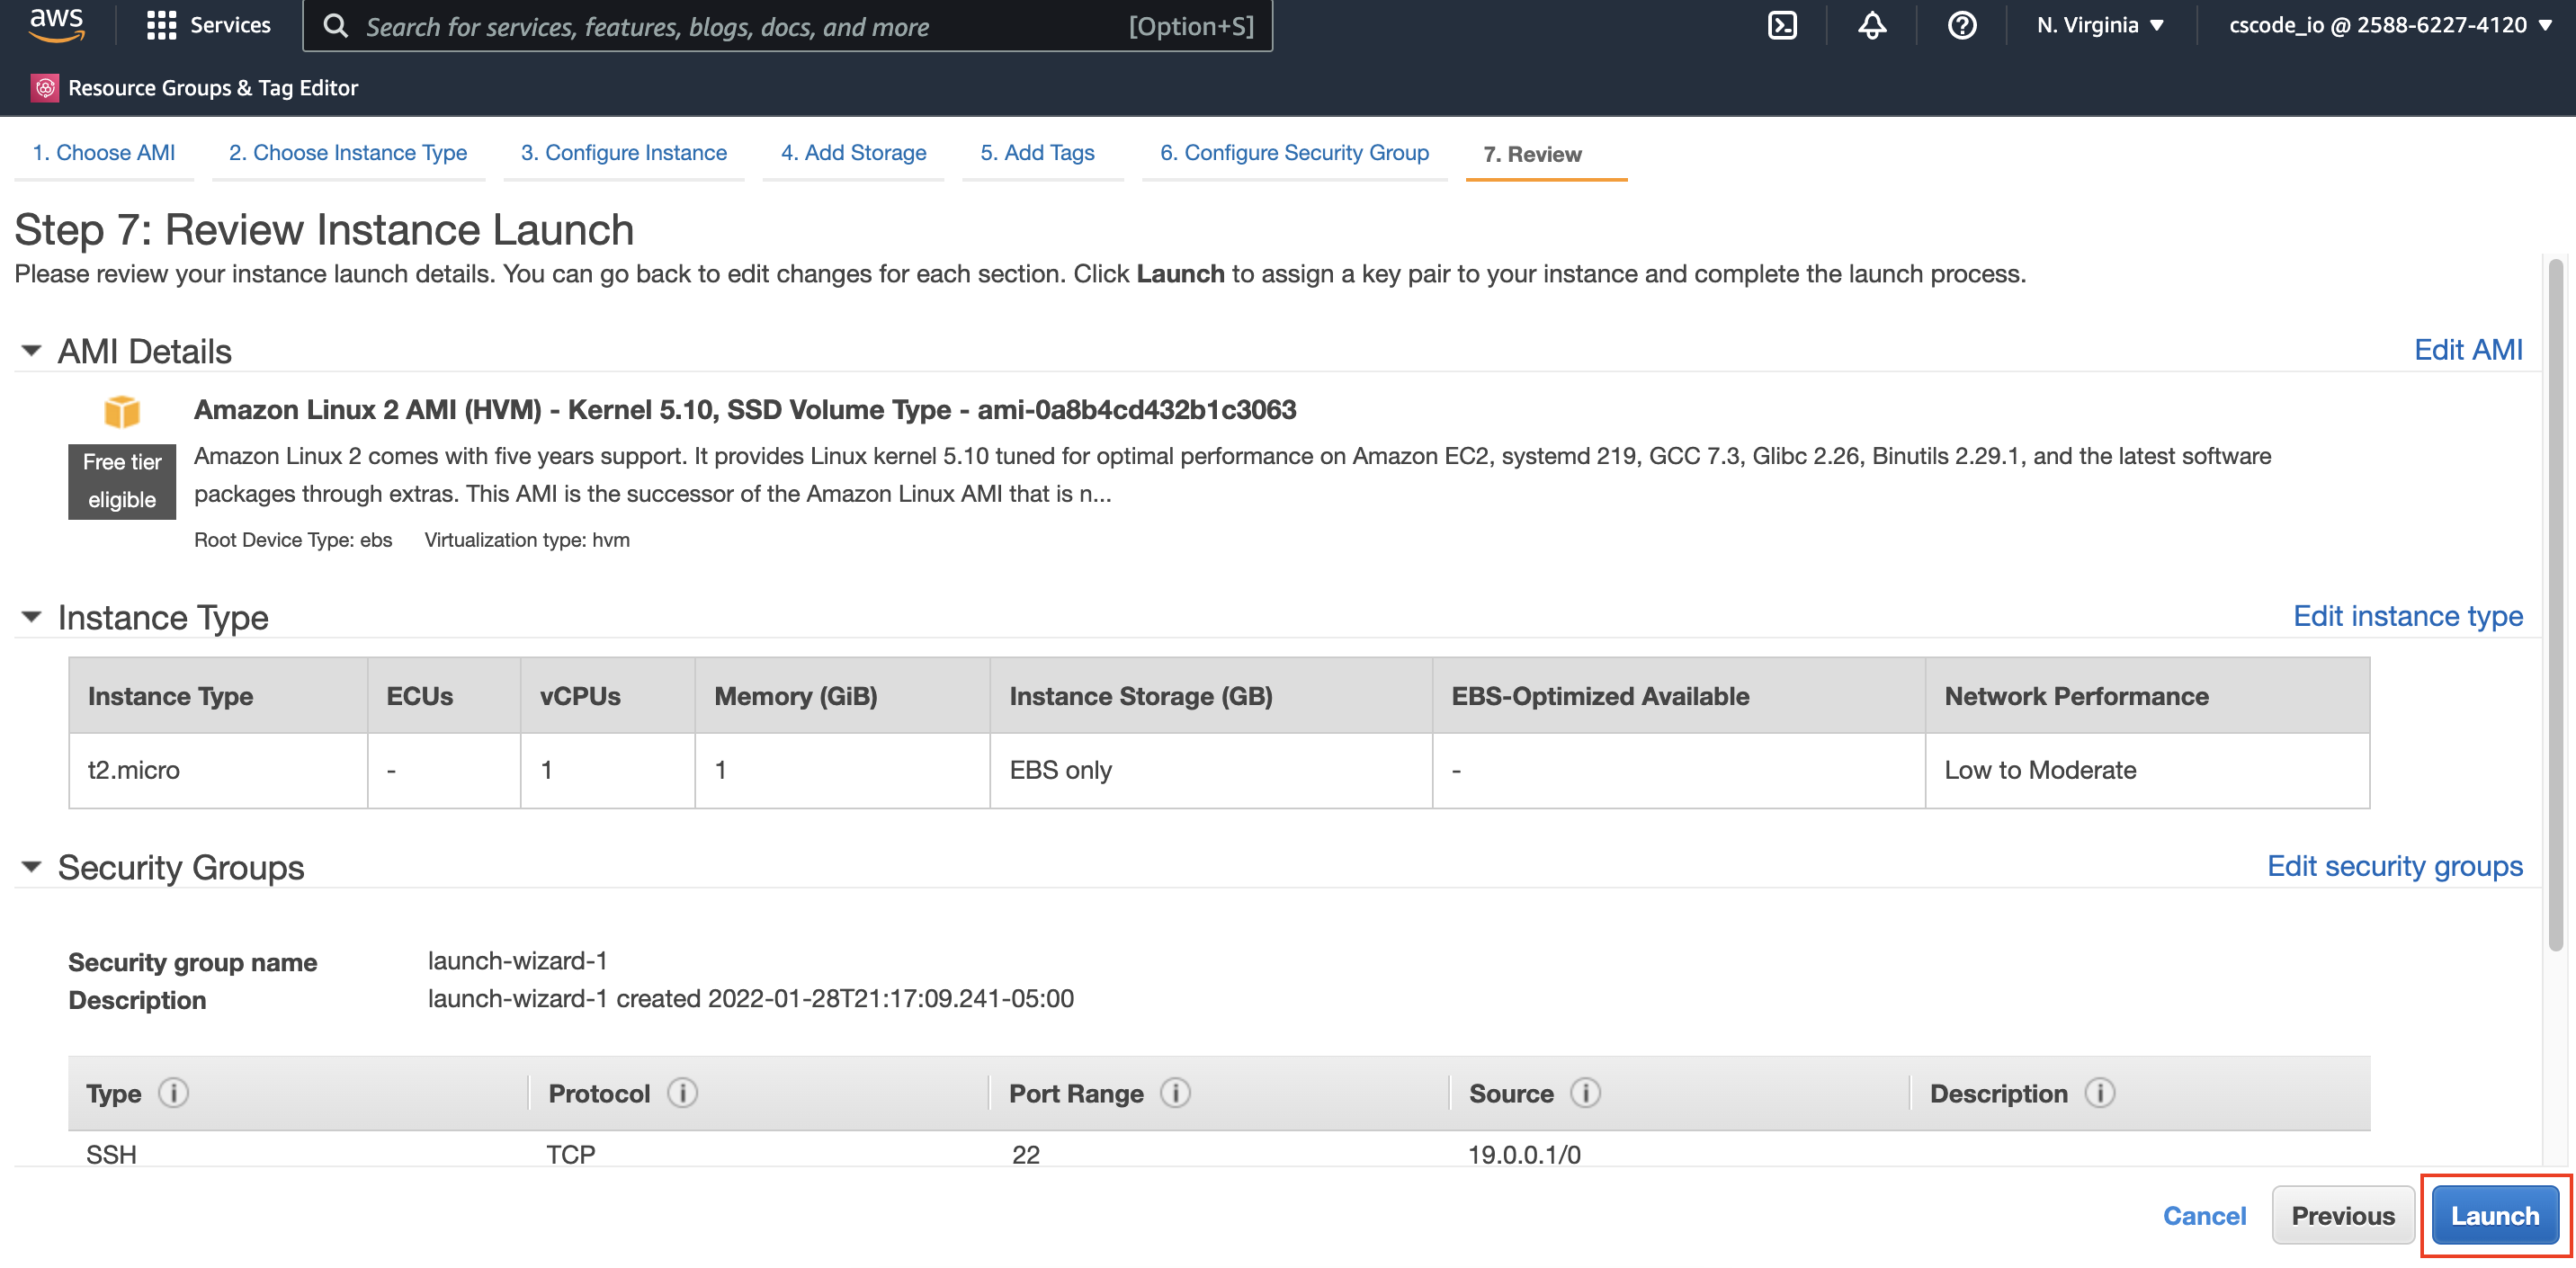
- In the next step, you can review all the settings that you have chosen and launch the instance.